
Festive Cool Spring Nails 2026 Ideas: Fresh Designs With Flowers And Color
Spring always sneaks up on me the same way – one sunny afternoon, and suddenly I’m side-eyeing my manicure like it’s last season’s coat. You too? If 2026 is calling for anything, it’s nails that feel fresh, playful, and a little celebratory without turning into a full-on costume. So what makes festive cool spring nails 2026 ideas actually work in real life – color, tiny florals, glossy finishes, a hint of shimmer, or that clean minimalist “done” look?
In this article, I’m breaking down my favorite Ideas from the designs ahead, with a focus on wearable shapes, flattering spring shades, and nail art that looks impressive but still feels doable. I’ll share what to use, how to recreate each look at home, and the little details that make a manicure feel modern for spring 2026. Ready to find your next obsession – the one that makes you glance at your hands all day for no reason?
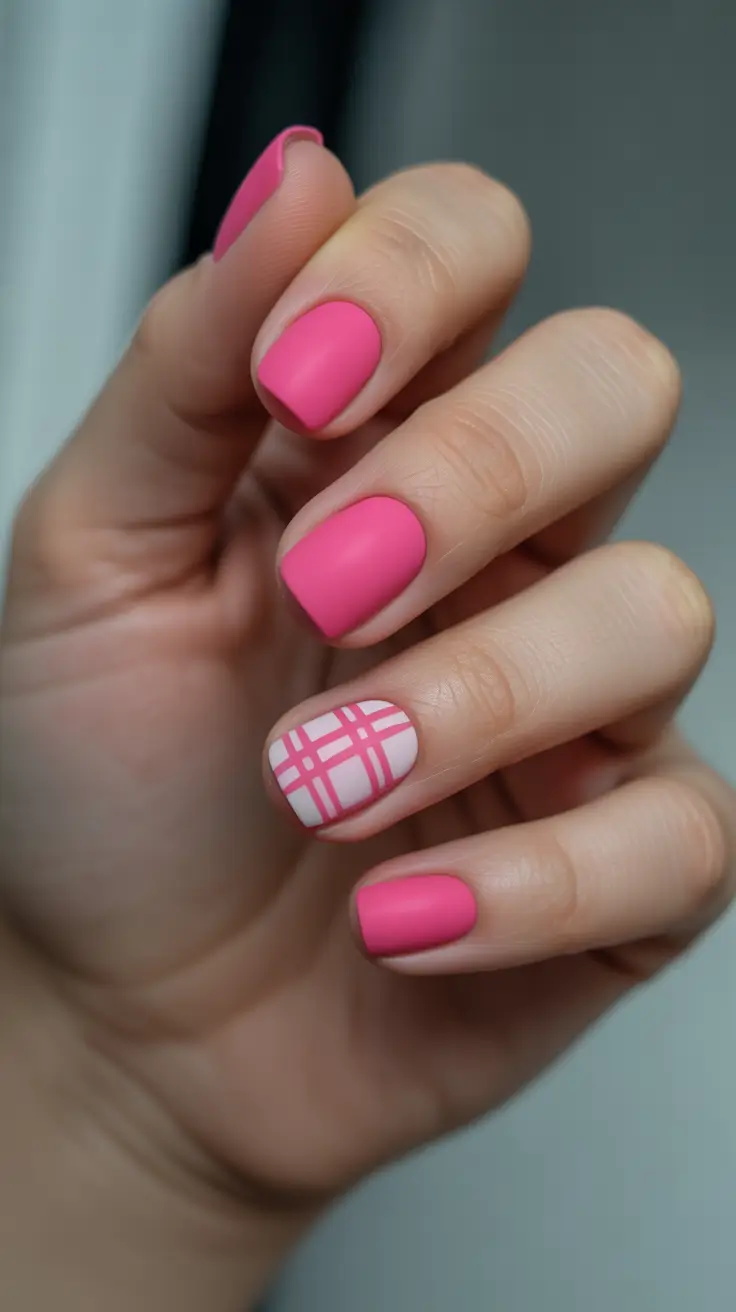
Hot Pink Petals With A Glossy Pop
This set is my definition of cool spring nails pink with a little “main character” energy – glossy fuchsia on most nails, then a soft blush base with bold floral accents on the feature nails. The shape reads as cool spring nails short and softly squared, which makes the bright color look clean, not loud. And the flowers? That’s the fun – it feels festive in a sweet, grown-up way, like fresh blooms on your kitchen counter.
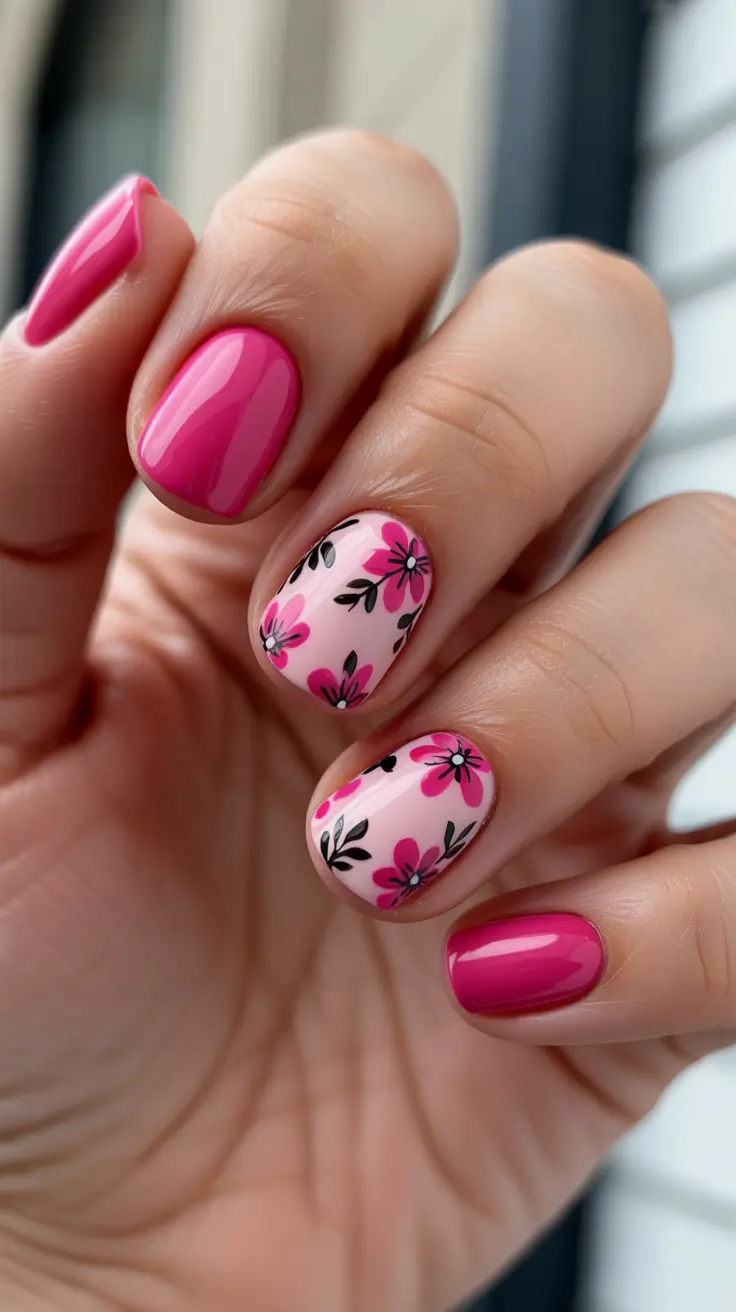
For materials, I’d grab a punchy pink gel like OPI GelColor “Strawberry Margarita” or DND “Hot Pink,” plus a pale pink base (Essie “Ballet Slippers” if you’re using regular polish, or a sheer builder gel if you prefer structure). For the florals, nail art brushes, dotting tools, and a black + white gel paint set make it way easier to get crisp petals. A glassy top coat is non-negotiable – it’s what makes the whole Designs moment look salon-level.
At home, I do two thin coats of the bright pink on the solid nails, curing (or drying) between each layer, then paint the accent nails with the sheer blush base. Once that’s set, I sketch petals using a dotting tool (big dots first, then pull them slightly to shape), add little black leaf strokes, and finish with tiny highlights for depth. My best tip – don’t rush the top coat; cap the free edge so the shine lasts longer and the Flower art doesn’t snag.
And honestly? This is the kind of manicure I wear when I want compliments in the grocery store aisle. It’s cheerful but still tidy – the perfect “spring reset” if your winter nails were all moody neutrals.
Navy And Folk Florals On Cream
This one gives cool-girl picnic vibes – creamy white nails with tiny red flowers and blue leafy details, plus one bold navy nail that anchors everything. It’s a very cool spring nails design idea because it balances crisp contrast with delicate art, and it still reads cool spring nails simple at a glance (because the pattern is clean and repeated, not chaotic). It also feels festive in a subtly Americana way without screaming holiday.
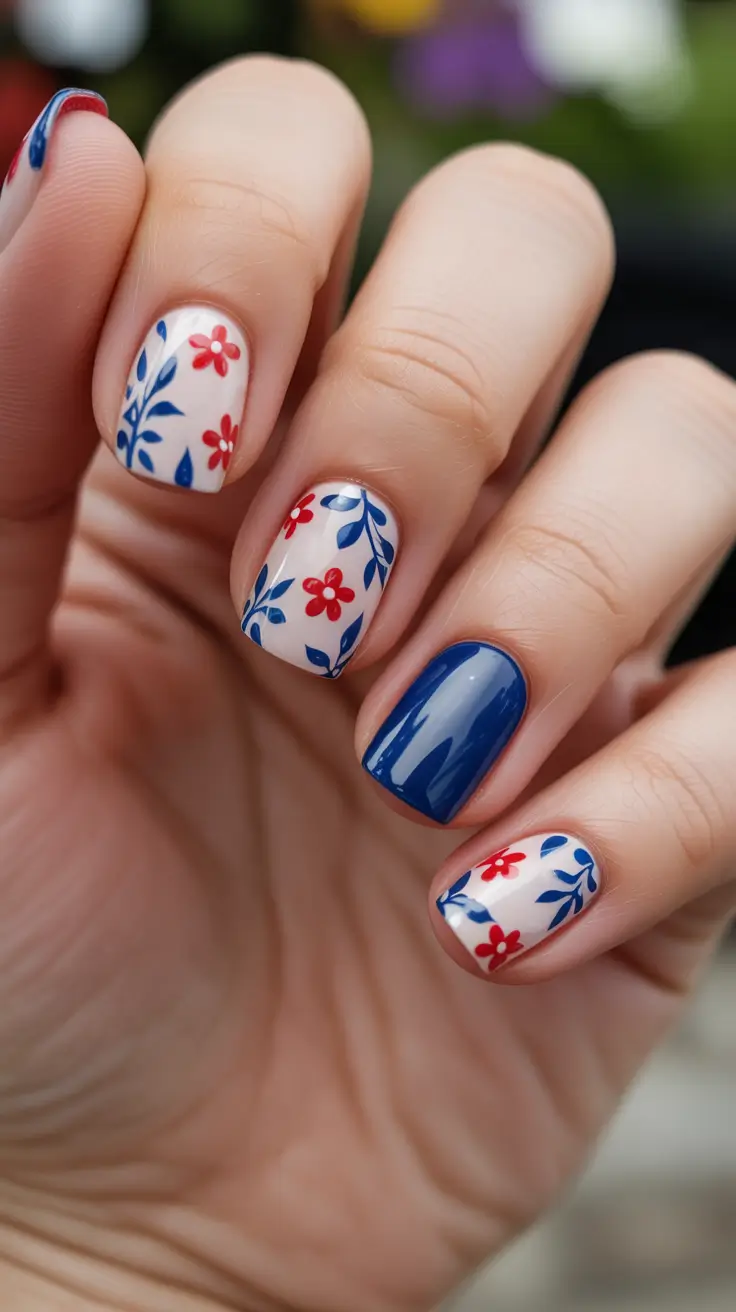
If I’m recreating it, I’d use a creamy base like OPI “Alpine Snow” (that perfect White), a deep blue like Essie “Style Cartel” or OPI “Russian Navy” for the solid nail, plus a true red for the little flowers. For the blue leaves, a fine-liner brush is your best friend, and a dotting tool helps the petals look intentional instead of wobbly.
Process-wise, I start with the solid navy nail first (it’s forgiving and makes you feel like progress is happening fast). Then I paint the creamy base on the others and let it fully set before adding art – patience here saves you from smears. I place a few small red flower dots, pull them into petals, then add blue leaf sprigs to frame the nail edges so it looks airy, not crowded. Finish with top coat, and you’ve got Inspo that looks boutique, not DIY.
My take – this is the manicure I’d choose for a spring weekend that’s half errands, half brunch. It’s polished, slightly artsy, and the navy accent makes it feel intentional enough for work, too.
Deep Green Blooms With A Clean Edge
If spring 2026 had a “cool tone” anthem, this would be it – a glossy, deep forest green paired with pale mint floral accents and a few swirly details. It’s a chic way to wear cool spring nails green without going neon, and the short, rounded-square shape keeps it wearable. The contrast between dark base and light petals makes the design look crisp and almost graphic – very modern.
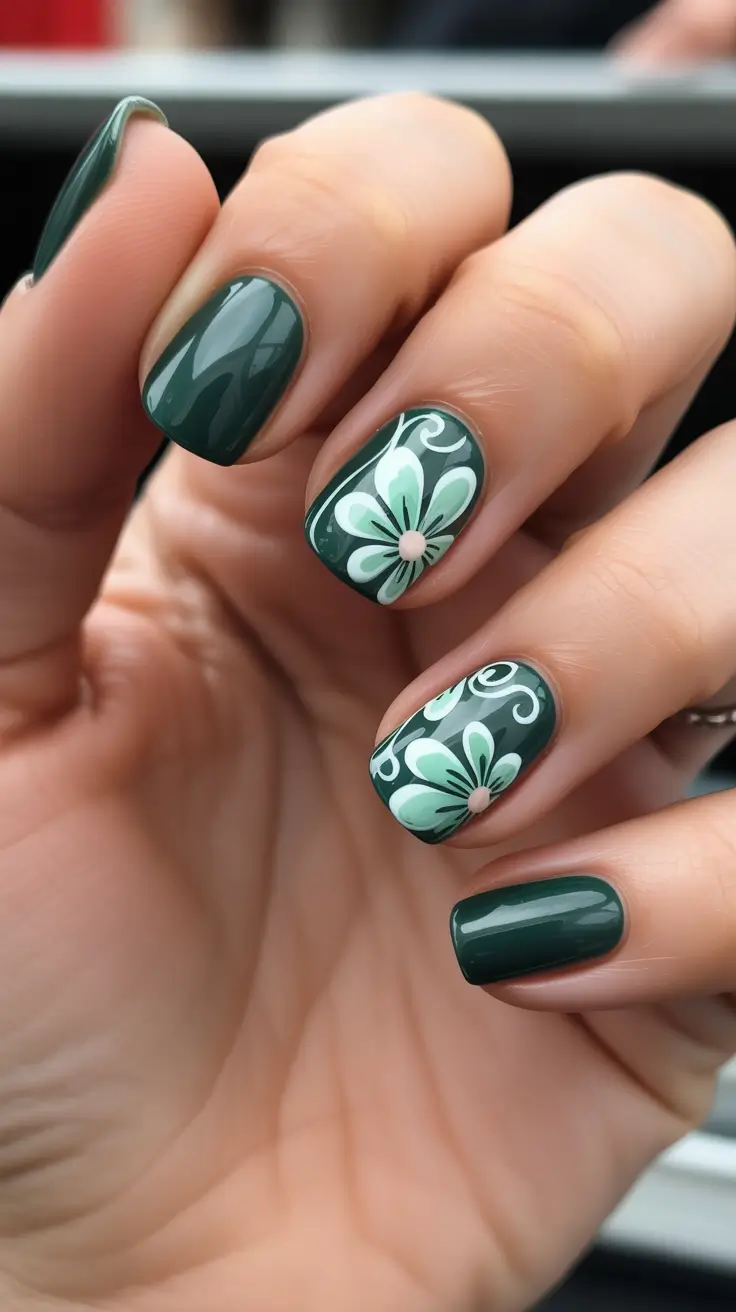
For products, I’d go with a rich green gel (DND “Jungle Green” vibes, or OPI “Stay Off The Lawn!!”), plus a mint gel paint for the flowers and a bright white for highlights. A thin striping brush helps with the little curls, and a top coat with serious shine turns this into that “expensive nails” look. If you’re doing regular polish, grab a quick-dry top coat so the art doesn’t drag.
To DIY it, paint all nails green except the accent ones, cure/dry, then lay down the green on the accent nails too as the background. Next, use mint to form five rounded petals, add a soft center dot, then refine edges with tiny strokes so it looks symmetrical. The swirl details come last – light pressure, slow movement, and don’t overthink it. Seal everything with top coat, making sure the surface is smooth so the flower doesn’t feel raised.
This is my personal favorite when I want “cool spring” instead of “pastel spring.” It feels a little mysterious, like a night-out color, but the floral keeps it season-appropriate – best of both worlds.
Sky Blue Daisies With Playful Dots
Okay, this one is pure happy energy – bright sky blue nails with crisp white daisies and scattered black dots that make everything feel a little more graphic and fun. If you’re hunting for cool spring nails blue that still feels festive, this is it. The daisies are simple enough to do at home, but the contrast makes the whole thing look like intentional nail Art.
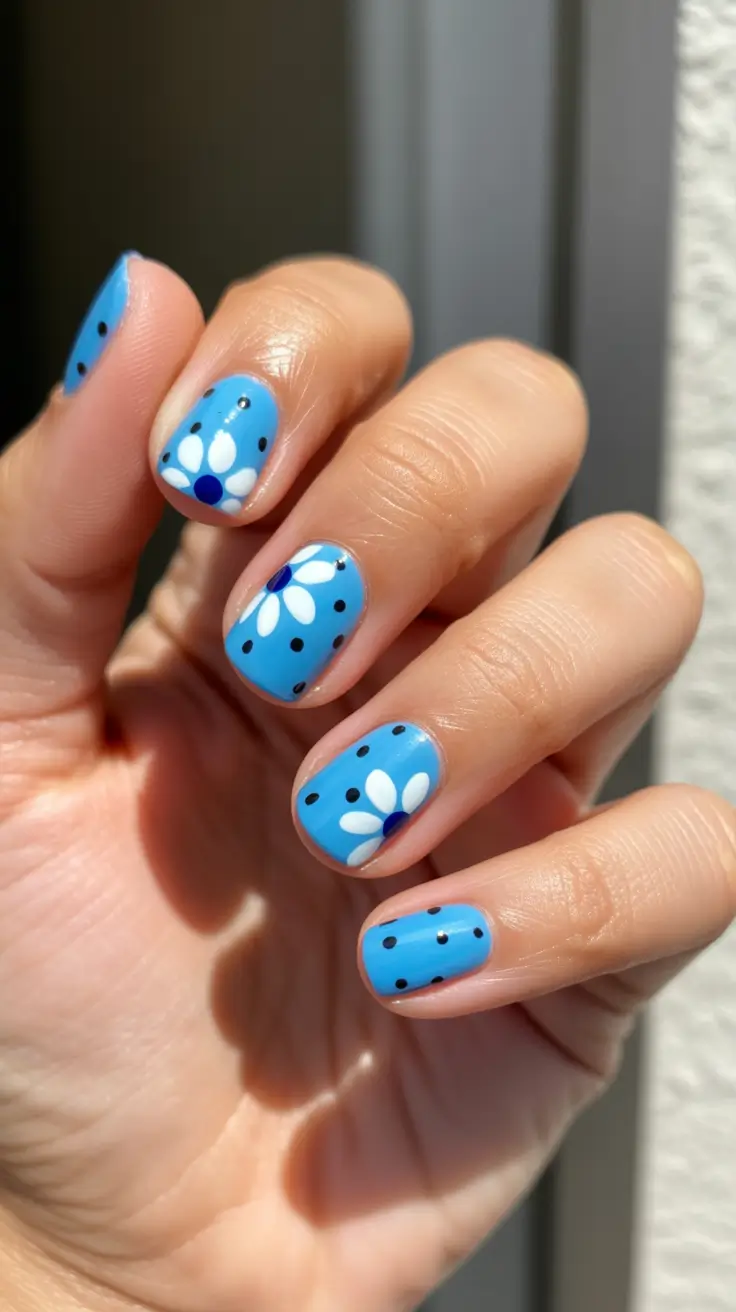
Material-wise, I’d pick a bright blue (Essie “Butler Please” energy, or OPI “Tile Art To Warm Your Heart”), plus an opaque white gel paint for the petals and a deep navy or black for the dot details. A dotting tool makes daisies ridiculously easy – you can literally “stamp” the petals into place. And if you want this to last, a durable top coat is key, especially on short nails that get a lot of daily action.
For the steps, do two coats of blue and let it fully set. Then dot five to seven white petal dots in a circle, add a center dot (navy looks especially cute here), and finish with scattered tiny dots to balance the design. My rule – leave a little breathing room near the cuticle so it stays looking fresh as it grows out. Top coat, cap the edge, and you’ve got an instant mood boost.
Real talk – this is the manicure I’d wear for a spring trip, a weekend market, or anytime I want my hands to look cheerful in iced-coffee selfies. It’s playful, but not childish – that’s the sweet spot.
Lavender Minimal Daisies For Soft Cool Spring
Lavender always hits differently in spring – it’s sweet, but it still reads cool-toned and modern, which is exactly why this feels like cool spring nails purple done right. The base is a smooth pastel violet, with a single white daisy detail on a few nails so it stays minimal and polished. If you like cool spring nails simple looks that still feel special, this is such a good “everyday festive” option.
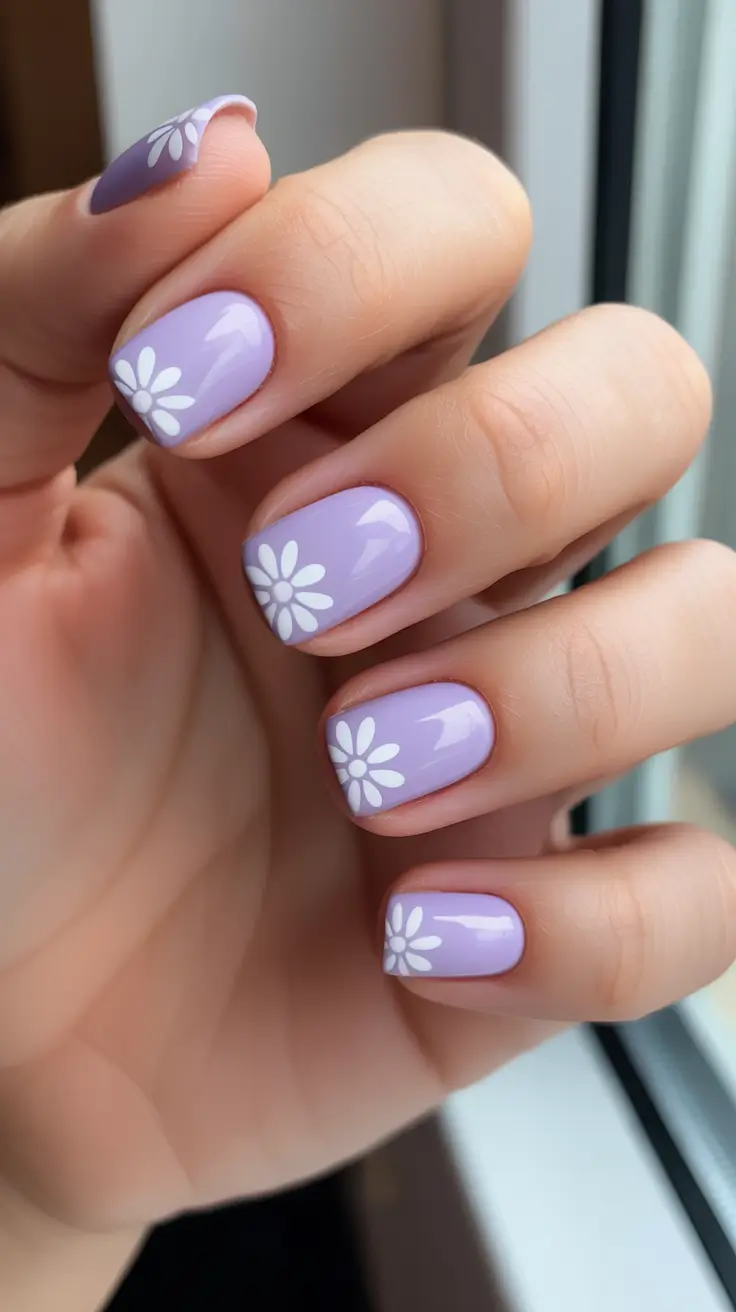
I’d recreate it with a lilac polish like OPI “Do You Lilac It?” or Essie “Lilacism,” plus a bright white for the petals. You don’t need a whole kit for this – a dotting tool (or even the rounded end of a bobby pin) can make the flower, and a glossy top coat keeps the pastel from looking chalky.
Steps are simple: two coats of lavender, let it set, then add one daisy per accent nail – five or six petal dots and a tiny center. The trick is placement – I like the flower tucked slightly toward a corner so it looks airy and not too “sticker-like.” Seal with top coat and keep cuticle oil nearby so the whole manicure looks extra fresh.
This one feels like the friend who always looks put-together without trying. It’s soft, calm, and cute in a very grown-up way – and yes, it makes typing, texting, and ring selfies look prettier.
Sage Daisy Color-Block Charm
I’m obsessed with this soft green palette – it’s giving modern garden party in the most easygoing way. The nails are cool spring nails short and neatly rounded, with a subtle two-tone split that makes the daisies pop without looking busy. The little Flower details read crisp and clean, and that glossy top coat makes the whole look feel intentionally “done,” not crafty.
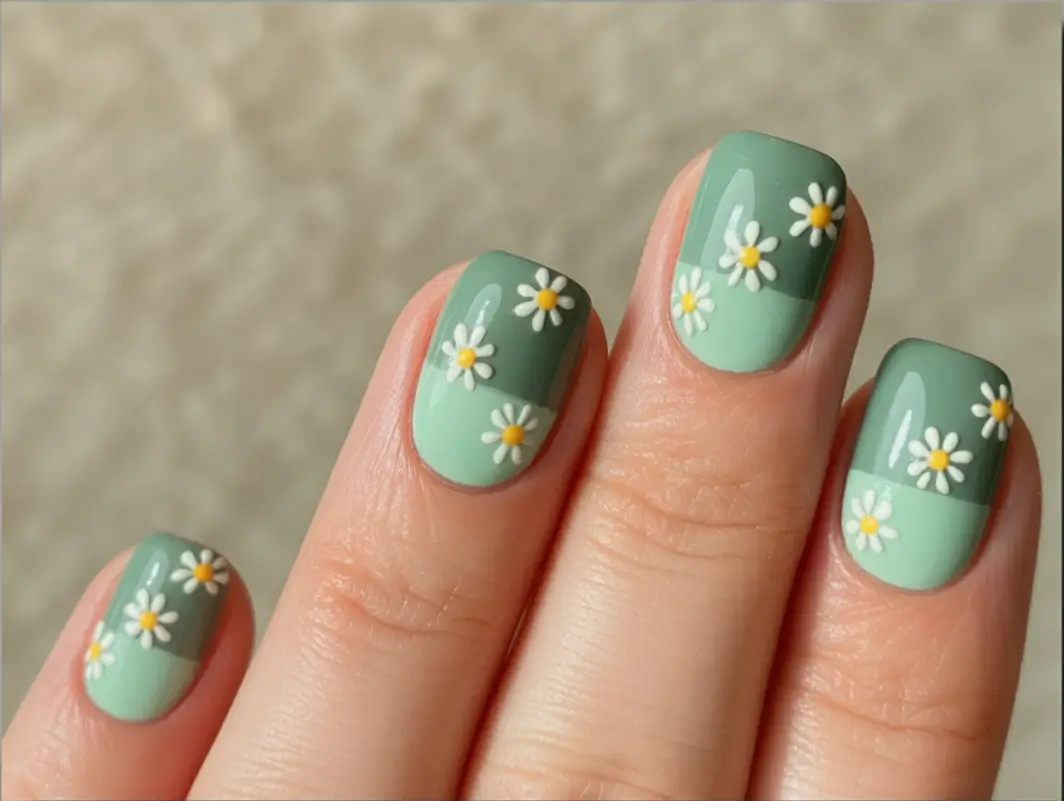
To recreate it, I’d grab two greens from the same family – a muted sage and a lighter mint (think OPI’s soft green tones or Olive & June’s springy greens), plus a bright White and a sunflower-yellow for the daisy centers. A fine detail brush or a dotting tool is the real MVP here, and if you’re not confident free-handing petals, nail stickers work too (no shame – I use them when I’m in a hurry).
Here’s my at-home flow: paint the lighter green base, cure/dry fully, then block the deeper green tip area with striping tape or a steady hand. After that, dot a yellow center first, then add tiny white petals around it – five to seven petals looks the most daisy-like. Finish with a plumping top coat to “glass” everything in; it helps the design look salon-smooth even if your petals aren’t perfect.
And honestly? This is the kind of cool spring nails design I’d wear on repeat because it looks cute up close but still reads polished from a distance. If you’ve been wanting cool spring nails green that feel festive without going neon, this one hits the sweet spot.
Glossy Meadow Green With A Sparkle Twist
This one is such a wearable mix – creamy green on most nails, a daisy accent, and that glittery statement nail that catches light like jewelry. The shape feels softly squared, so if you’re into cool spring nails square, this is a pretty approachable version that still feels feminine and fresh. The combo of solid color + Art accent is exactly what I mean by festive-but-grown.
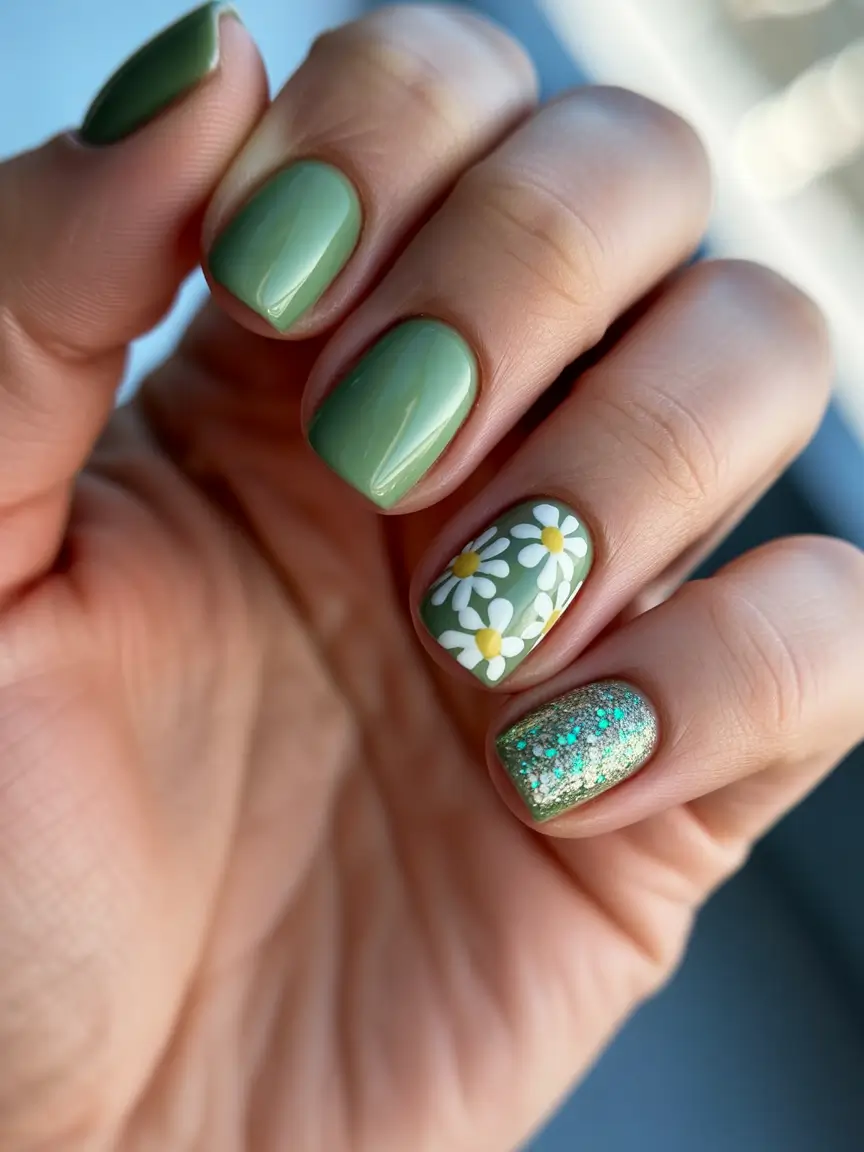
For products, I’d use a creamy medium green (DND and OPI both do great “leafy” shades), a crisp white for the petals, and a yellow polish for centers. For the sparkle nail, a dense glitter topper works – think ILNP-style shimmer formulas, or even a fine glitter gel layered over a matching base so it looks dimensional rather than chunky.
If you’re doing it at home, paint all nails green first, then pick one accent nail for the daisy cluster and one for glitter. On the floral nail, dot two or three flowers in different sizes – that little variation makes it feel more expensive. On the glitter nail, do two thin coats and cap the free edge; glitter loves to chip if you skip that tiny step.
This is one of my favorite Inspo looks for spring weekends – it’s still office-friendly, but the sparkle says you’re not just “running errands,” you’re out living.
Lavender Petals For A Cool-Girl Spring
Lavender nails always make me feel like I have my life together, even when I’m absolutely winging it. This set leans glossy and minimal with two floral accents, so it reads calm, clean, and quietly festive. If you’ve been hunting cool spring nails purple, this is a dreamy direction that doesn’t feel overly sweet – it’s soft, modern, and wearable.
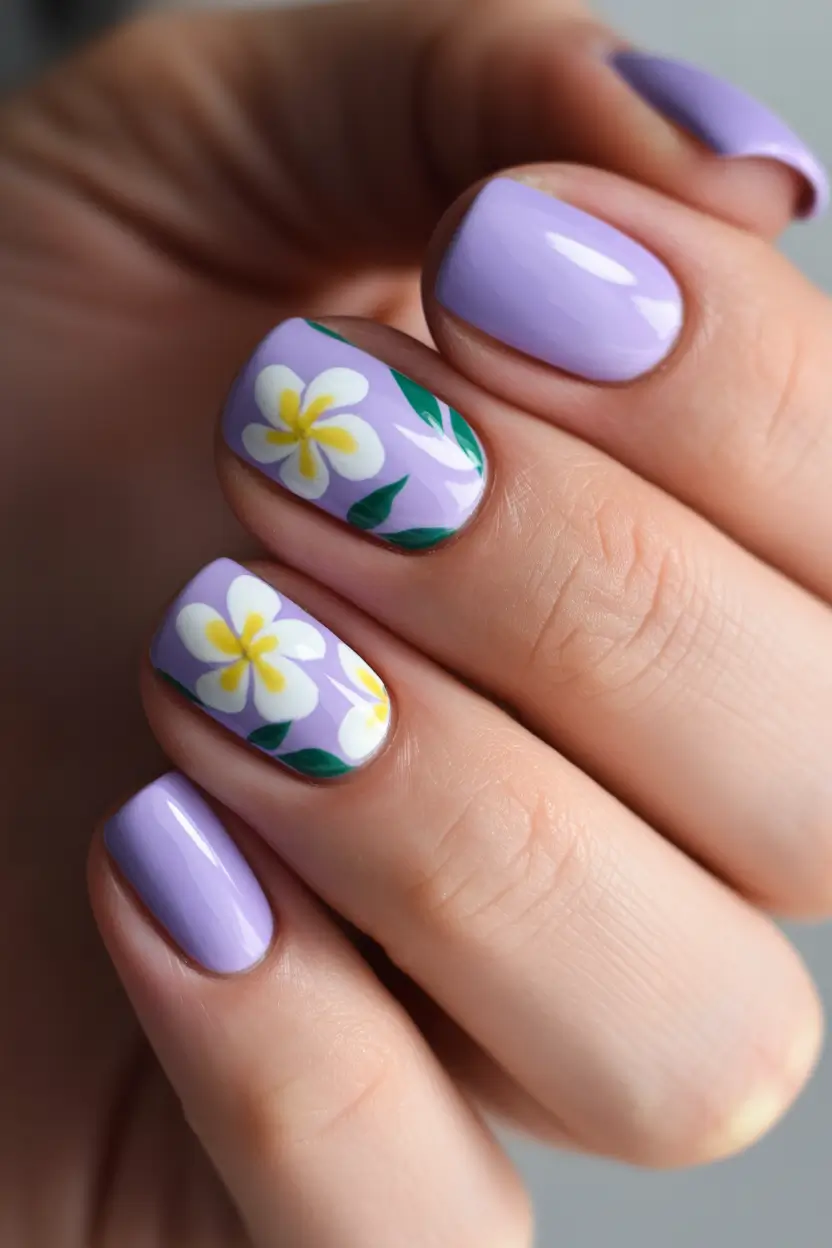
I’d build this with a milky lavender base (Essie and OPI usually have a perfect pastel-purple in spring collections), plus a true white and a butter-yellow for the flower centers. A leafy green detail polish helps the florals look “finished,” not flat. If you’re using gel, choose a self-leveling top coat – it smooths out tiny brush strokes in nail art.
My easiest method is to keep the florals on just two nails, then make them slightly different so the set feels custom. Paint the base, cure/dry, then place one flower slightly off-center for a more editorial look. Add leaves last, and keep them crisp – too many leaves can make it feel busy fast.
I love this as a “cool spring” option because it’s basically cool spring nails simple, but with that little floral wink. Would you wear this with denim and a white tee, or are you more of a dress-and-sandals girl in spring?
Sunshine Daisies On Soft Square Tips
This yellow moment is pure serotonin. The short, softly squared shape keeps it practical, but the daisy print makes it feel like spring break energy – even if you’re just answering emails. If you want cool spring nails yellow that still feel refined, this is the sweet spot: playful pattern, clean edges, glossy finish.
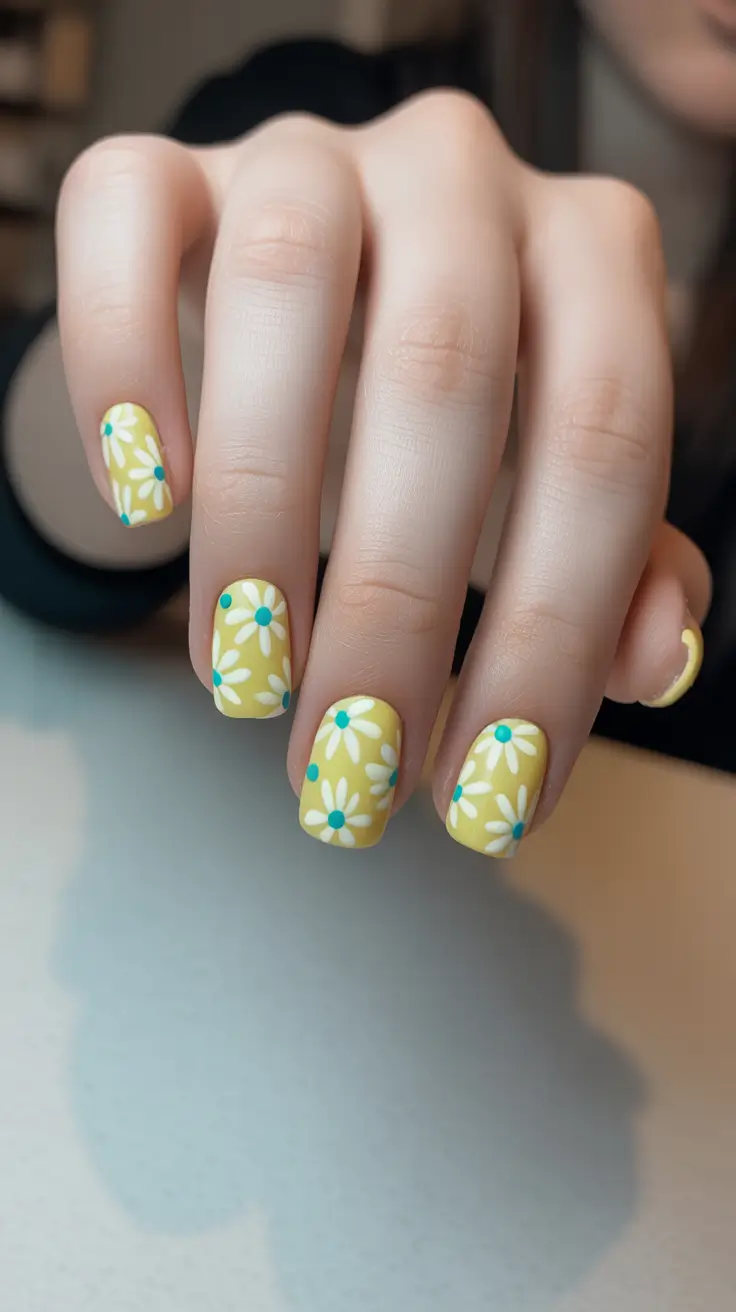
To recreate it, I’d use a creamy pastel yellow base (avoid anything too sheer – you want that smooth, opaque look), plus white for petals and a bright teal or turquoise for the center dots. That tiny unexpected center color is what makes the whole design feel more “2026” than throwback.
At home, do two coats of yellow, then map out a few center dots first so the flowers feel evenly spaced. Add petals around each dot, and keep the petals slightly oval, not perfectly round – it reads more natural and less stamp-like. Seal it all with a thick top coat, especially if you’re using regular polish, because nail art edges can catch on everything.
This one screams picnic season to me. It’s the manicure equivalent of putting on sunglasses and instantly feeling cooler – even if you’re in sweatpants.
Hot Pink Daisies With A Pop Finish
This set is the bold sister of the spring florals – glossy, bright, and impossible to ignore in the best way. The punchy pink base instantly feels celebratory, while the daisies keep it cute instead of harsh. If you’ve been craving cool spring nails pink with a fun twist, this is one of those Designs that makes your whole mood feel lighter.
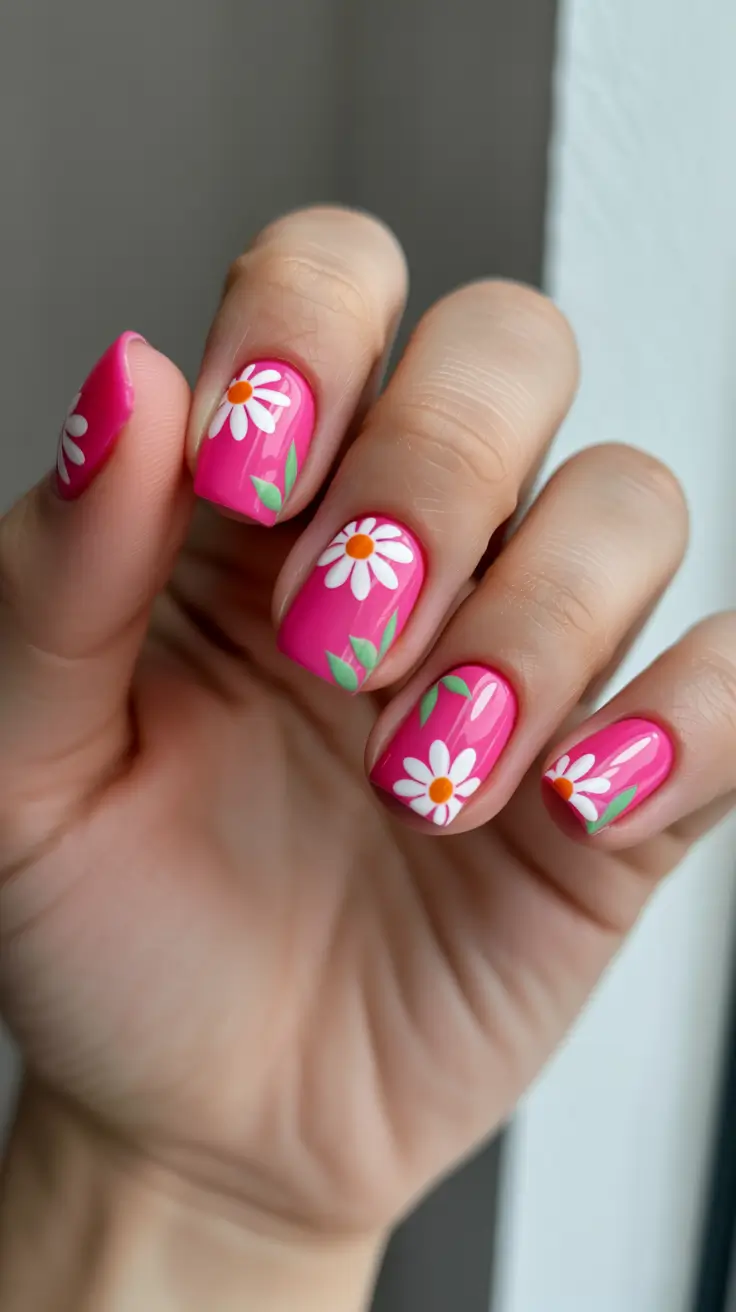
For materials, I’d pick a vivid pink cream polish (OPI, DND, and Olive & June all do great saturated pinks), plus white for petals, orange or warm yellow for centers, and a leafy green for tiny accents. A detail brush helps, but you can totally cheat with a dotting tool – petals can be made from small dots dragged slightly outward.
I usually keep the daisies near the cuticle or corners so the look stays modern. Paint the pink base, then place one daisy per nail (or two on a couple nails) so it doesn’t turn into wallpaper. Top coat is non-negotiable here – it gives that candy-like shine that makes the color look expensive.
Real talk – this is my go-to when I want my nails to do the flirting for me. It’s bright, it’s confident, and it makes every ring and iced drink photo look better. Would you wear this full-out pink, or would you swap the base for something softer and keep the daisies the star?
Lavender Pansy Garden With Glossy Calm
This look is pure spring poetry – a smooth lavender base on most nails, plus crisp White accent nails painted with violet pansies and soft green leaves. The overall vibe is elegant and fresh, and it screams cool spring nails purple in a way that feels festive without being flashy. I also love that the finish is high-gloss – it makes the florals look like they’re floating on the nail.
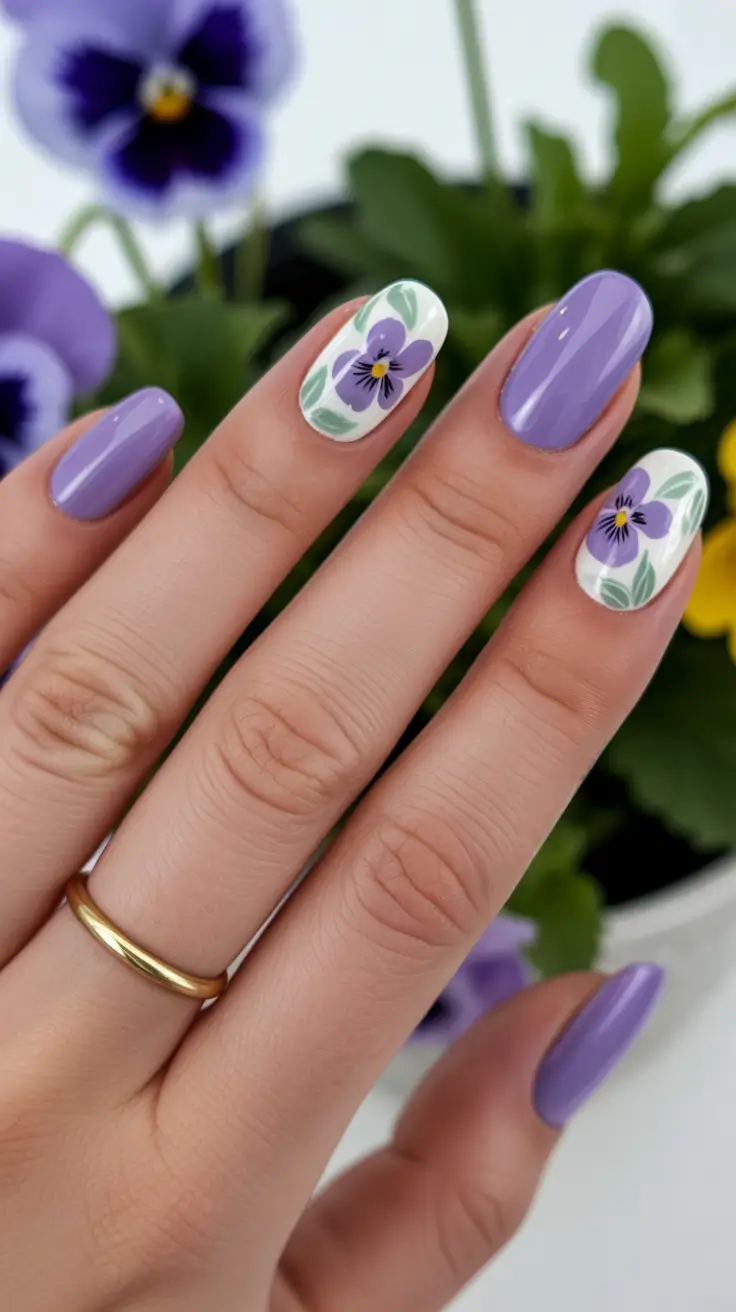
For materials, I’d pick a true lavender gel (OPI GelColor “Do You Lilac It?” is a classic) and an opaque white base like OPI “Alpine Snow.” To paint the pansies, you’ll want a purple duo (one medium violet + one deeper purple for shading), a tiny detail brush, and a dotting tool for the yellow centers. This is one of those Designs where a good top coat matters – I’d go with something super glossy like Seche Vive (regular polish) or a no-wipe gel top coat for that glass finish.
To DIY it at home, I start with two thin coats of lavender on the solid nails, cure/dry, then two coats of white on the accent nails. Once the base is fully set, I block in the pansy petals with the lighter violet, add depth with the deeper purple near the center, then dot a tiny yellow core and finish with delicate black lines if you want that realistic pansy look. Seal everything carefully so the floral Art stays smooth and wearable.
I’m telling you – this is the manicure I’d choose when I want compliments that feel classy, not chaotic. It’s soft, floral, and quietly confident – major Inspo for spring events, brunch, or even just feeling cute while answering emails.
Sunny Matte Daisies With A Soft Pink Base
This set is basically bottled sunshine – a matte buttery yellow paired with a blush-pink accent nail covered in white daisies. The long cool spring nails square shape makes the colors look extra editorial, like a clean fashion moment instead of “cute craft.” If you’re craving cool spring nails yellow that still feels wearable, this combo hits the sweet spot.
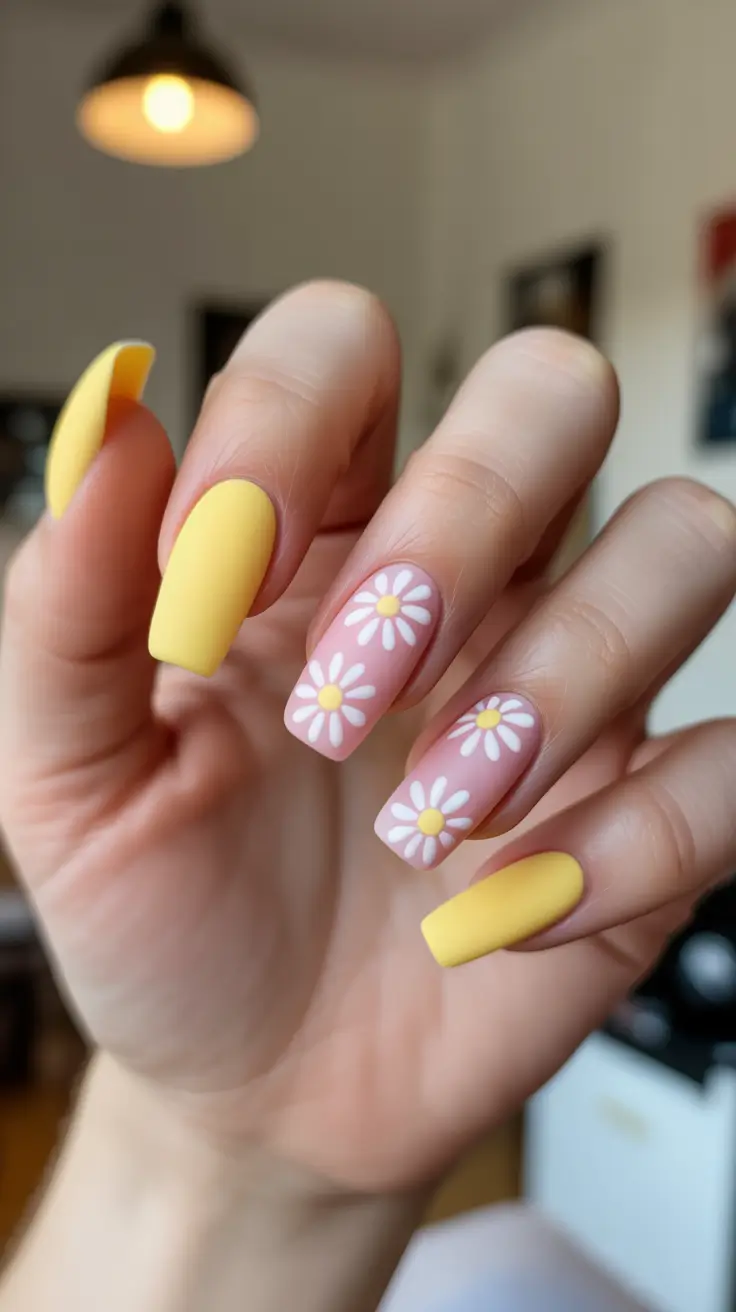
To recreate it, I’d use a matte-friendly yellow like OPI “Exotic Birds Do Not Tweet” (then add a matte top coat) or a DND pastel yellow gel. For the accent nail, grab a soft pink base (Essie “Fiji” is the vibe) and an opaque white for the petals, plus a sunny yellow for the daisy centers. A dotting tool makes the Flower design fast and super consistent, even if you’re not a nail artist.
Here’s how I do it at home: shape and prep first (matte shows every bump, so a smooth base is everything), then apply two coats of yellow on the solid nails. On the accent nails, paint the blush base, then dot the daisy petals in a circle with white, add a yellow center, and finish with matte top coat over everything for that velvety look. The matte seal is the “secret sauce” – it makes the design feel modern, not sugary.
If you ask me, this is the manicure for that first real spring weekend when you’re finally wearing lighter layers and you want your hands to match your mood. Bright, clean, and a little flirty – the best kind of festive.
Matte Hot Pink With A Clean Plaid Accent
Now this is a power pink moment – matte fuchsia on most nails with one crisp plaid accent that looks tailored, like a blazer in nail form. It’s absolutely cool spring nails pink, but the matte finish keeps it from feeling too shiny or loud. That single accent nail turns it into a true cool spring nails design idea – playful, yes, but still polished.
For supplies, I’d use a hot pink polish (DND “Pink Panther” energy) and a matte top coat. The plaid nail needs a pale nude or soft pink base, plus the same hot pink for the lines – a striping brush or nail art liner pen makes this ten times easier. If you want the lines super sharp, a thin tape guide can help, but honestly, a steady hand and a light touch get you there.
At home, I apply two coats of pink, then matte top coat on the solid nails. For the plaid accent, paint the base nude-pink, let it fully dry/set, then draw straight vertical and horizontal lines, crossing them for that grid effect – keep the spacing even so it looks intentional. Matte top coat goes last, and it magically makes the whole thing look more “designer.”
This one feels like the manicure I’d wear when I want to look put-together but still have fun – like, yes I’m doing spring, but I’m doing it with edge. If you’re usually a neutral girl, this is a surprisingly easy way to try bold Pink without feeling out of character.
Short Purple And Yellow Daisies With A Playful Mix
This set is giving spring candy – glossy violet nails mixed with one sunny yellow accent, plus cute daisy details scattered across the purple. The shape reads as cool spring nails short, which makes the color-blocking feel extra wearable and not too “statement.” If you want cool spring nails purple and cool spring nails yellow in one look, this is a super cheerful way to do it.
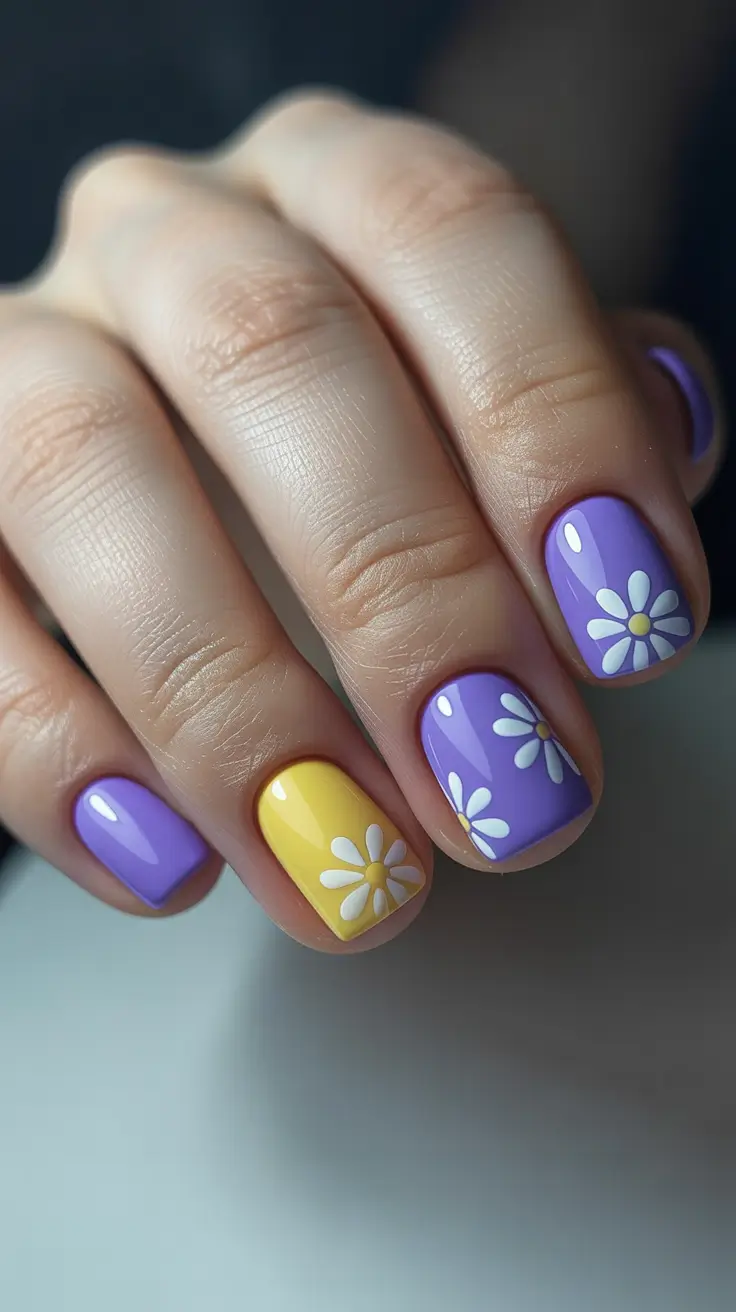
I’d grab a bright spring purple (OPI “Do You Lilac It?” but deeper, or Essie “Play Date”) and a creamy yellow (OPI “Sun, Sea, and Sand in My Pants” vibes). For the daisies, you’ll want an opaque white for petals and a tiny dotting tool for the centers. This is one of those Ideas that looks detailed, but it’s actually pretty beginner-friendly.
My at-home steps are simple: paint two coats of purple on most nails, two coats of yellow on the accent nail, then add daisies once everything is fully set. For each daisy, dot five to seven white petal dots in a circle, then add a small center dot (yellow or white depending on contrast). Top coat goes on last, and I always cap the edge because short nails get the most wear.
Personally, I love this for “in-between” spring weather – it’s bright enough to feel optimistic, but the cool purple keeps it grounded. It’s the kind of manicure that makes you smile when you catch your hands on the steering wheel.
Mint Green And Blue Florals On A Milky Base
This one feels like a fresh breeze – minty green solid nails paired with milky White accent nails dotted with tiny blue flowers and soft green leaves. It’s clean, airy, and very “cool-toned spring,” so it fits perfectly under cool spring nails green with a dash of cool spring nails blue. The short shape keeps it sweet and practical – very “pretty hands, zero hassle.”
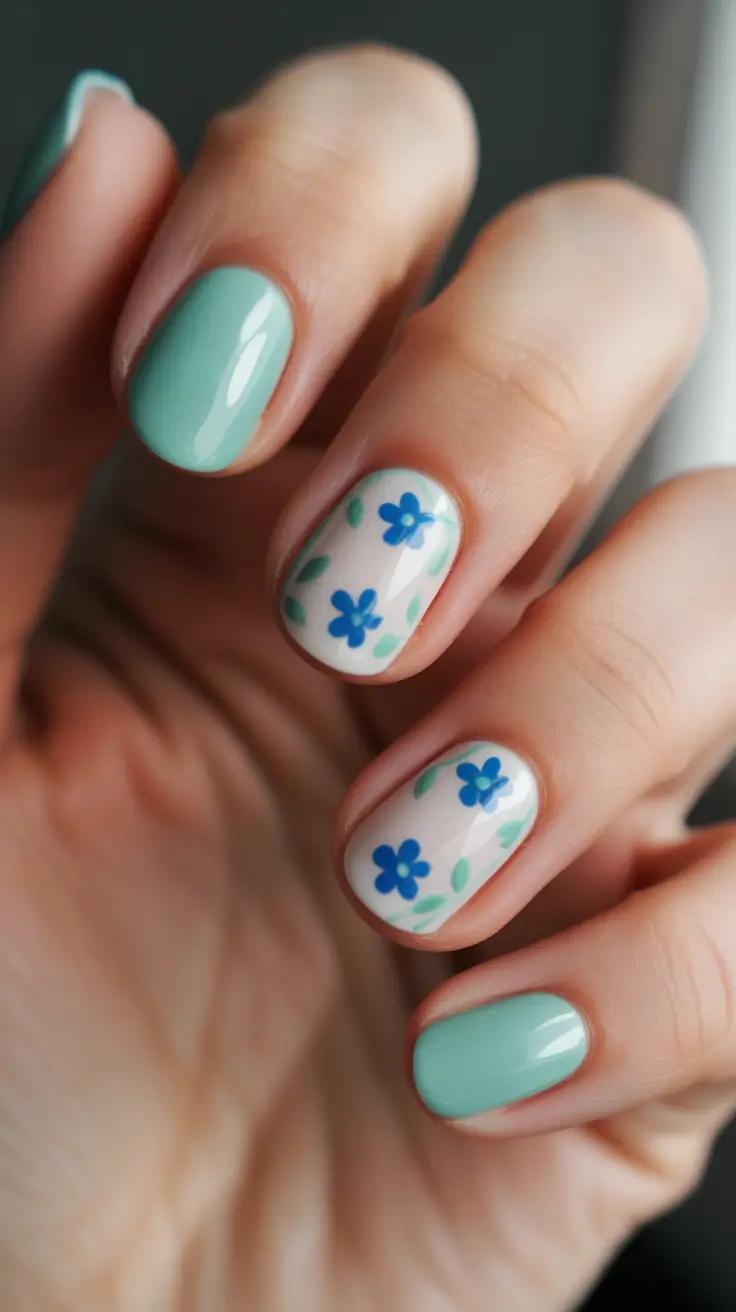
For products, I’d use a mint polish like Essie “Mint Candy Apple” or a similar mint gel, plus a soft milky white for the accent nails (not stark white – more like “cream in coffee”). For the flowers, grab a medium Blue and a dotting tool, plus a small brush for the leaves. This is the kind of Inspo that looks expensive because the palette is so clean.
To DIY it, I paint the mint nails first, then the milky base on the accent nails. Once dry/set, I dot small blue petals into simple five-petal flowers, then add little green leaf strokes around them to make the pattern feel balanced. Top coat smooths everything out, and a quick cuticle oil moment at the end makes it look instantly more polished.
I’d wear this when I want something calm but still cute – like the manicure equivalent of a crisp white tee and your favorite jeans. It’s soft, seasonal, and quietly festive, especially if you love Flower details but don’t want anything too busy.
Pastel Patchwork With Feather-Detail Accents
This manicure feels like a little spring party on your hands – sunny butter tones on the thumbs, a glossy baby Pink on the middle nail, and milky White accents with delicate feather-like line Art. The shape is softly squared, so it totally fits cool spring nails square, and the overall vibe is festive without being loud – like you’re wearing color, but in a “clean girl who still has fun” way.

If I were recreating this at home, I’d pick a creamy pastel Yellow, a sheer-to-opaque milky white, and a blushy pink (OPI and Essie both have iconic soft pinks that don’t look streaky). For the feather lines, a thin nail art brush plus a black or charcoal striping gel makes life easier, and a dotting tool helps keep the detailing crisp instead of shaky.
My steps are pretty simple: prep, base coat, then paint each color on its assigned nail with two thin coats. Once fully dry or cured, I’d do the feather detail on the white accent nails using light, quick strokes that taper at the ends – it looks more “airy” that way. Seal everything with a glossy top coat and cap the edges, because pastels look best when they’re extra shiny.
I love this as cool spring nails simple with a twist – it’s the kind of Inspo that looks expensive even if you DIY it on a Sunday night while half-watching a show.