Elegant Fun Spring Nails 2026 – Cute Designs, Fresh Colors And Playful Nail Art
Spring always hits me like a tiny personality refresh – suddenly I want brighter coffee orders, lighter layers, and nails that feel polished but still make me smile. So what does elegant fun spring nails 2026 actually look like? Think playful details with clean execution: color combos that pop without screaming, Art that feels intentional (not chaotic), and designs that still look chic when you’re holding an iced latte, typing all day, or wearing your most basic outfit.
In this article, I’m answering the questions I keep getting every spring: Which Colors feel fresh for 2026 without looking too trendy too fast? What makes a manicure read “elegant” even when it’s full of Design and Art designs? And how do you recreate these looks at home – without a drawer full of tools or a three-hour learning curve? Let’s get into the cutest, most wearable fun spring nails ideas that still feel grown-up.
Blush Bunny Charm With Glossy Square Tips
I’m obsessed with how this set balances sweet and polished – a glossy baby pink base on short square nails, plus one accent that turns into a mini moment. The bunny face on the feature nail is clean and minimal (not cartoonish in a cheap way), and the white-and-pink contrast keeps it looking fresh for spring. The white polka dots on the other nail add texture without making the whole look too busy – it’s exactly the vibe of fun spring nails pink that still reads elegant.
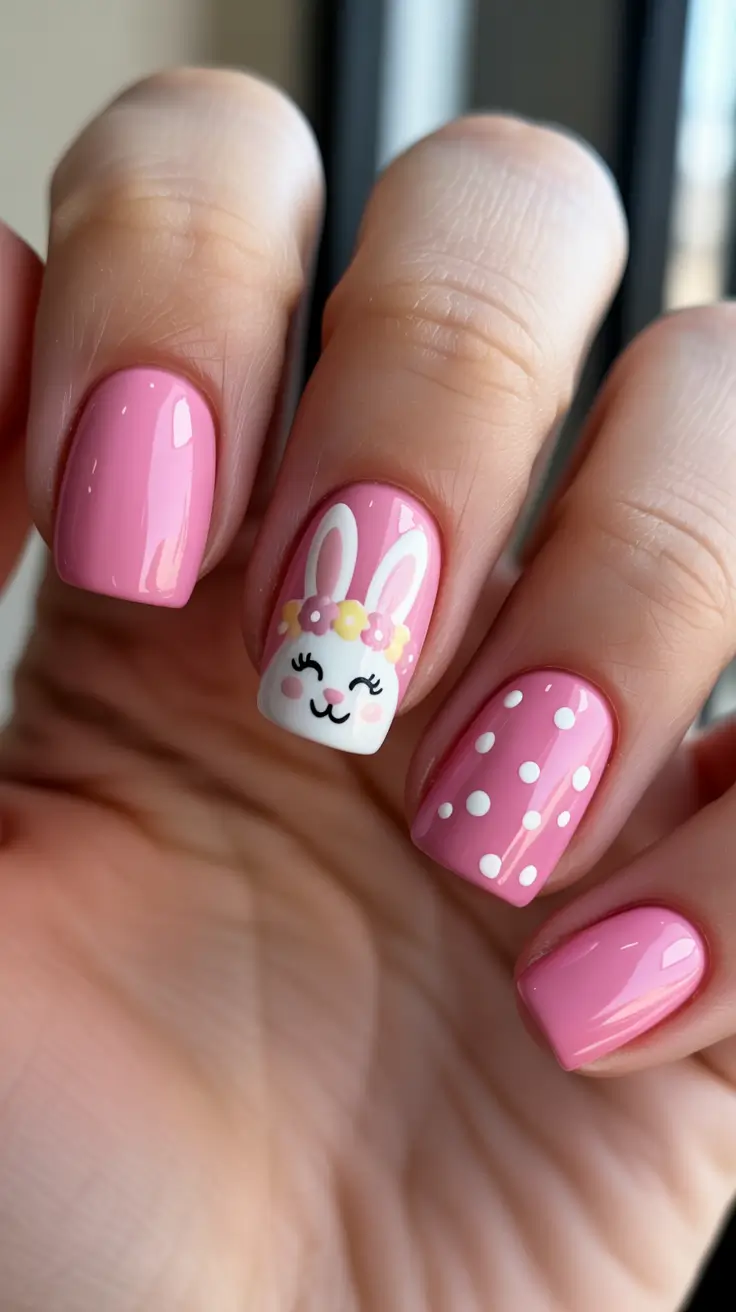
For this, I’d grab a sheer-cute pink gel like OPI GelColor in a soft bubblegum family (or Gelish “Make You Blink, Pink”), plus a crisp white for details – Beetles or Madam Glam white gels are great for line work. You’ll also want a dotting tool for the polka dots, a fine liner brush for the bunny outline, and a glossy top coat that really seals the look. This is one of those spring gel nails ideas color combos fun sets where the magic is simply “pink + white + tiny details.”
At home, I’d paint the pink base first and cure, then choose one nail for the bunny accent and block in the white “face” shape at the tip. After curing, I’d add the ears and little floral crown details with a liner brush, keeping the strokes slow and controlled – like you’re drawing with intention, not rushing through it. Finish with dots on the accent polka nail, cure again, then top coat everything so it looks salon-smooth. If you want a shortcut, nail artists often recommend keeping detail work super thin so it doesn’t bulk up under top coat – and it really does make designs look more professional.
Honestly? This is my go-to when I want fun spring nails design short square that won’t clash with outfits. It feels flirty, but still clean enough for work, brunch, or that “I might run into someone” errand run.
Classic Red Ladybug Mini Art That Pops In Daylight
This set is bold in the most wearable way – a true red base with tiny ladybug accents that look graphic and chic, not childish. The black dots and little eyes are placed neatly, so the design reads like intentional Art instead of random stickers. If you’ve been wanting fun spring nails red that still feel polished, this is exactly the kind of playful twist that keeps red from feeling too “winter holiday.”
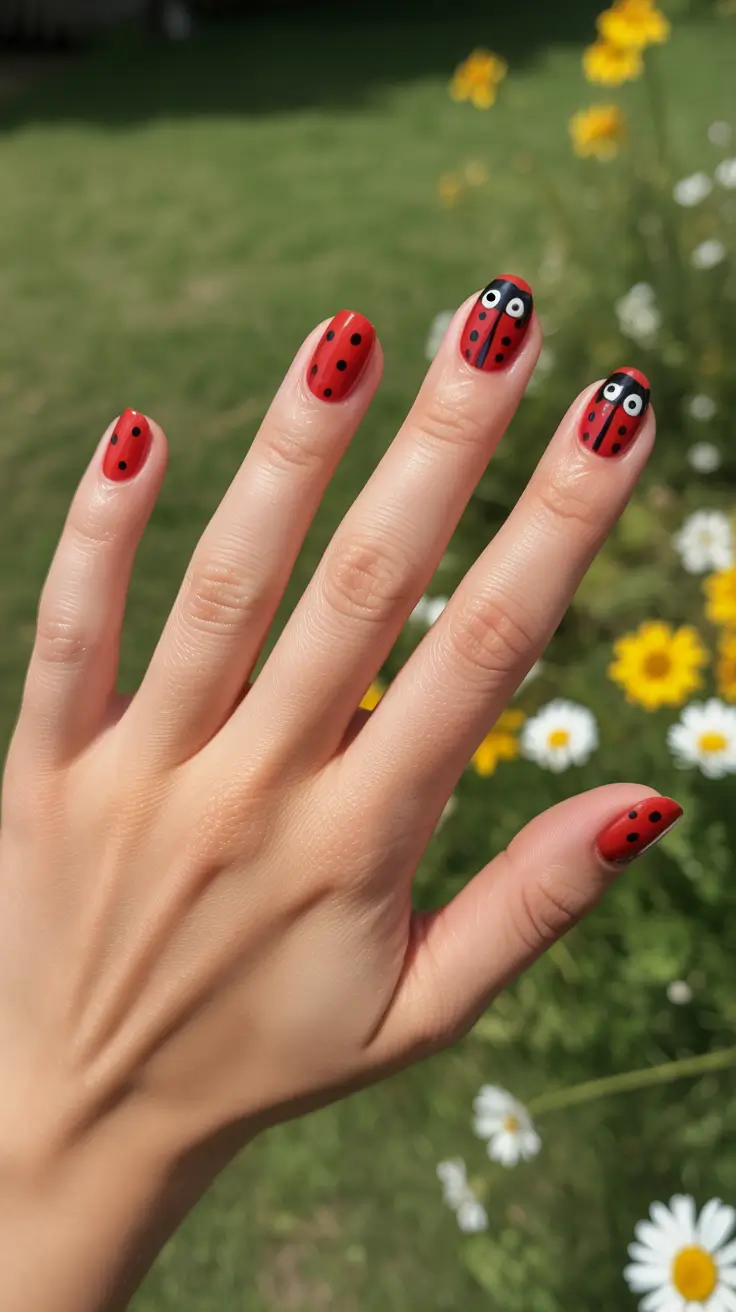
To recreate it, I’d use a bright cherry-red gel (DND makes great reds, and OPI’s reds are classics for a reason), plus a black gel paint for the ladybug head, stripe, and dots. A dotting tool is non-negotiable here – it’s what keeps the spots uniform. This manicure is basically fun spring nails design with a simple palette: red, black, and a tiny touch of white for the eyes.
If you’re doing it at home, paint your red base and cure fully, then add the black stripe down the center on the accent nails. Next, dot the spots – I like to place the larger dots first, then fill in smaller ones, so it looks balanced. The little white eye dots go on last, and then you seal everything with a glossy top coat. Quick note from experience: cure between steps if your hands are shaky – it’s the easiest way to avoid smudging detail work.
This one always makes me smile because it’s playful without being loud. Like, “yes, I’m fun” – but also, “yes, I read the room.”
Bright Blue Minimal Set With A Butterfly Accent
This is the kind of spring manicure I reach for when I want color that feels confident but still clean – a glossy medium-bright blue on most nails, then one soft neutral accent with a butterfly illustration. It’s giving crisp denim energy, clear skies, and that first warm day where you suddenly remember you’re a main character. If you love Blue manicures, this is a gorgeous way to make them feel intentional and not too heavy.
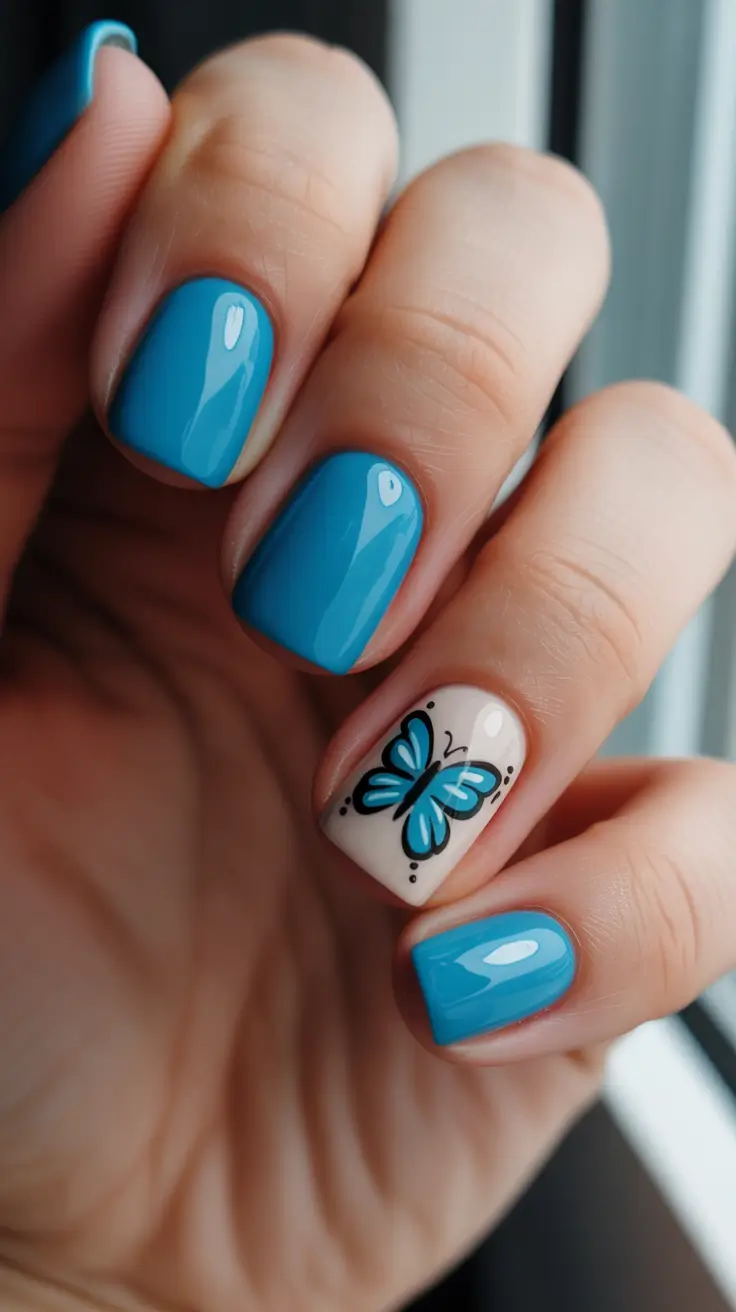
For materials, I’d choose a saturated blue gel (think DND “Blue Ocean” vibes) and a creamy nude or milky base for the butterfly nail. The butterfly can be done with stamping, decals, or hand-painted gel – whatever matches your patience level that day. Add a fine liner brush if you’re painting it, plus a shiny top coat to keep the whole set looking glassy and modern. This falls neatly into fun gel nails ideas spring because it’s bright, but still tidy.
At home, I’d paint the blue nails first, cure, then do the neutral accent. For the butterfly, you can use a decal and press it onto a slightly tacky layer, then top coat to lock it in. If you hand-paint, keep the outline thin and let the color fill be minimal – it looks more elegant that way and doesn’t overwhelm the nail.
I love this for those weeks when spring is half sunshine, half chaos. It’s cheerful, but it still looks “grown,” you know?
Neon Stripe And Checkerboard For A Playful Pop Moment
Okay, this set is pure serotonin – neon stripes, a punchy checkerboard accent, and a tiny sun detail that feels like a wink. Even though the colors are loud, the layout is what makes it feel elevated: each nail has one clear idea, so it doesn’t become visual clutter. If you want fun spring nails ideas that feel 2026-cool and not overly trendy in a try-hard way, this one nails it.

You’ll need a hot pink, a vivid orange, and a sunny yellow gel – the kind that actually shows up in two coats. I’d also keep a neutral base gel on hand for the sun nail so the yellow detail pops. Striping tape or a thin liner brush will help with the lines, and for the checkerboard, a small square brush or even a dotting tool can work if you’re careful. This is the definition of fun spring nails design ideas – bright, graphic, but still wearable.
For the steps, I’d start with base colors and cure, then map out stripes lightly before painting them in. The checkerboard is easiest if you create a faint grid first, then fill alternating squares – slow and steady wins here. For the sun, I’d place a simple circle and add short rays, keeping it minimal so it looks chic rather than cartoonish. Top coat everything for that “fresh gel set” shine.
This is the manicure I’d choose when my calendar is packed and I need something that instantly boosts my mood every time I look down. Tell me you don’t feel happier with neon on your nails – it’s basically science.
Honey Yellow With A Tiny Bee Accent For Spring Energy
Yellow in spring always feels brave in the best way – and this set makes it feel cute, intentional, and surprisingly elegant. The glossy yellow base is clean and bright, the bee accent is crisp, and the mix of stripes and polka dots adds personality without turning into chaos. If you want fun spring nails that still feel polished enough for everyday, this is such a smart sweet-spot.
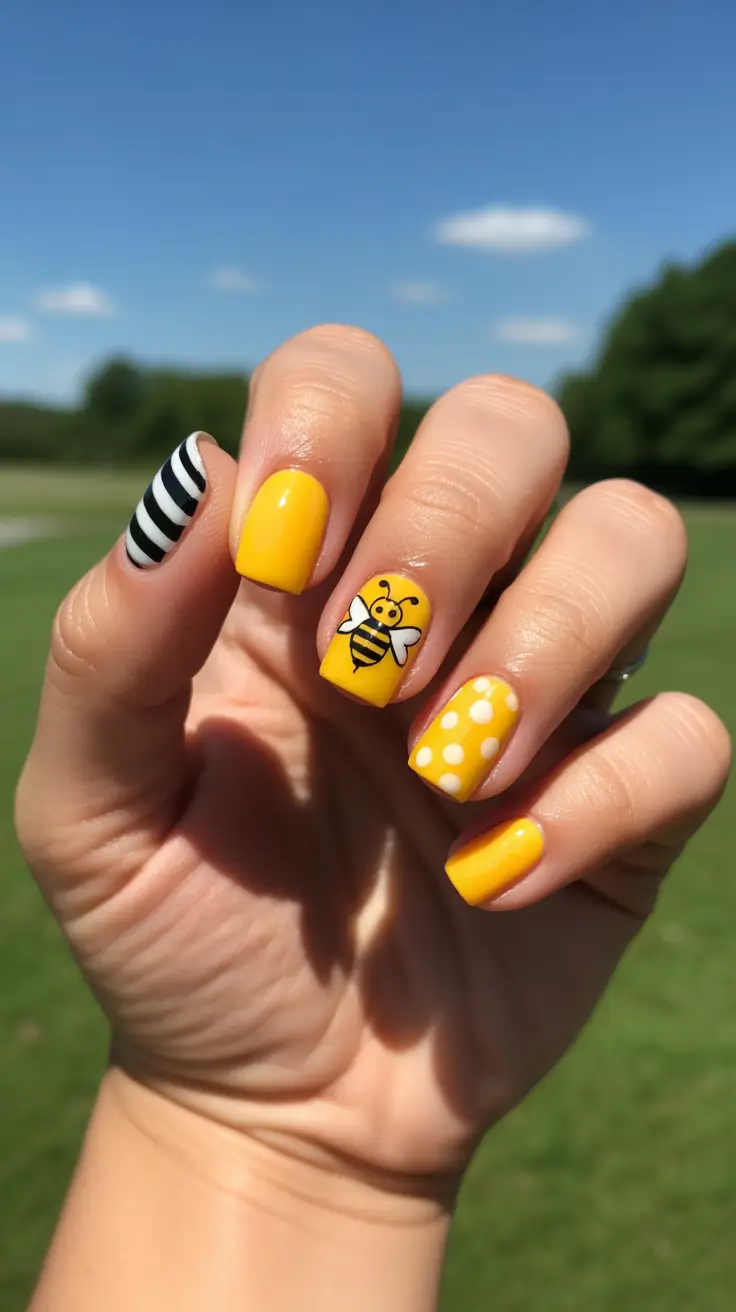
To do it, I’d grab a true sunflower yellow gel (OPI and DND both do great yellows), plus a black and white detailing gel for the bee and the stripe nail. A dotting tool helps for the polka dots, and a liner brush makes the bee wings and stripes look clean. This kind of Design is all about contrast – yellow that feels juicy, black lines that feel sharp.
My at-home method: two thin coats of yellow and cure, then pick one nail for the bee and sketch the body shape first. Add the stripes, then tiny wings in white, and finish with black outlines once it’s cured so the details stay crisp. The striped accent nail is easiest if you paint a white base first, cure, then add black lines in one confident pass.
I’ll say it – yellow nails can feel intimidating until you try them, and then suddenly you’re addicted. It’s like carrying a little pocket of sunshine around, even when spring weather is doing its moody thing.
Cloudy Blue Daydream
This manicure is the definition of soft joy – a glossy, powdery sky-blue base with fluffy white cloud Art drifting across short nails. The shape reads neat and practical, which is exactly why the design feels “grown-up cute” instead of childish. If you want fun spring nails short that still look tidy for meetings, errands, and life, this one is such a sweet spot – airy, clean, and quietly charming.
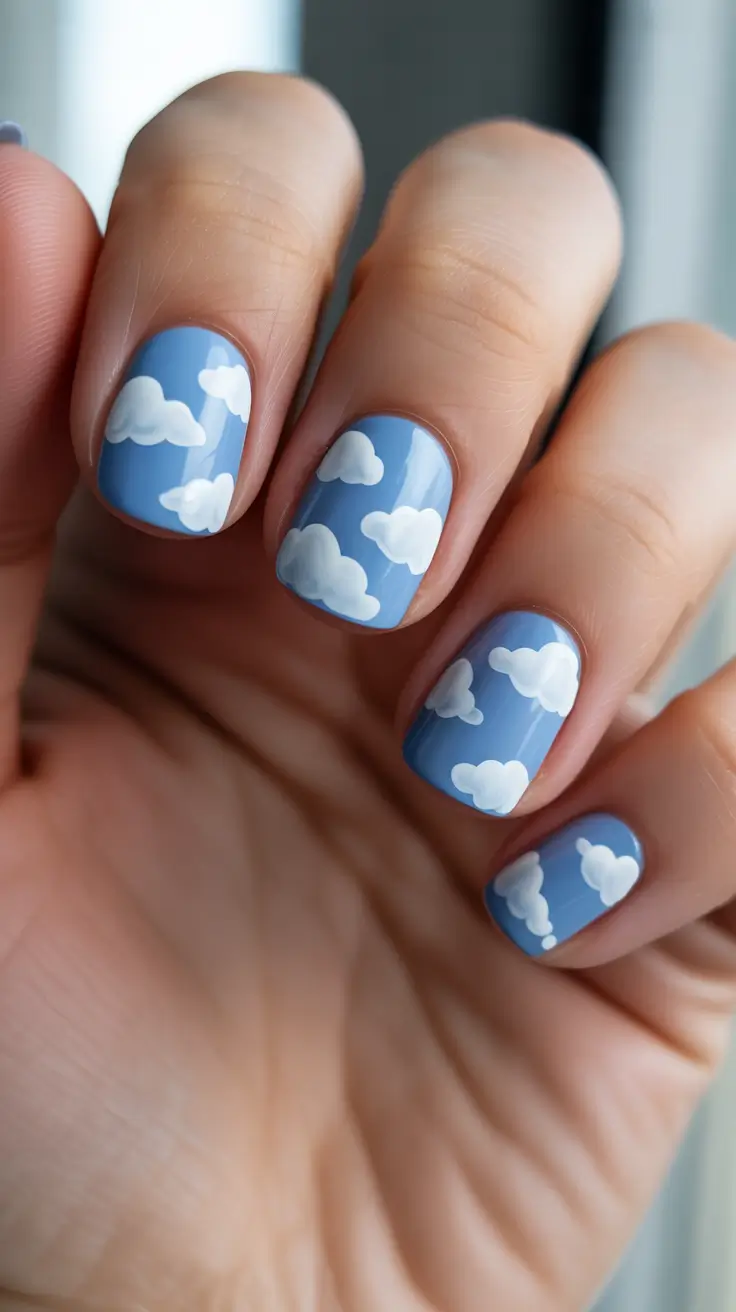
For materials, I’d grab a salon-smooth baby blue like OPI It’s A Boy! or Essie Bikini So Teeny (anything in that calm, mid-sky family). For the clouds, I like an opaque white such as OPI Alpine Snow or Essie Blanc, plus a fine liner brush and a small dotting tool. A plumping top coat matters here – Seche Vite or Essie Gel Couture Top Coat gives that glassy finish that makes the clouds look crisp, not chalky. This is pure fun spring nails energy, just done in a clean way.
Here’s how I’d do it at home – I paint two thin coats of blue, cure if I’m using gel, then sketch cloud puffs with a dotting tool (three to five dots in a cluster). After that, I connect and soften the bottoms with a tiny brush so the cloud edges look rounded, not like cartoon scallops. A quick tip I’ve picked up from pro nail educators – keep your white layer thin and build opacity slowly, because thick white polish can wrinkle under top coat.
Personally, I wear this when I want something that feels like a mood reset. It’s one of those fun spring nails design ideas that gets compliments from strangers in the coffee line, but still feels minimalist enough to pair with a blazer or a clean denim look. If your spring vibe is “I’m trying, but I’m not trying too hard,” this is it.
Sheer Nude Garden Party Florals
This look is pure spring romance with a modern twist – a sheer nude base topped with bright, simple daisies in mixed pastel shades. The flowers are spaced in a way that keeps the manicure looking light and intentional, not overcrowded. It’s playful, but the translucency makes it feel sophisticated, like nails that belong at brunch and also at a casual wedding shower. Think fun spring nails design with a whisper of elegance.
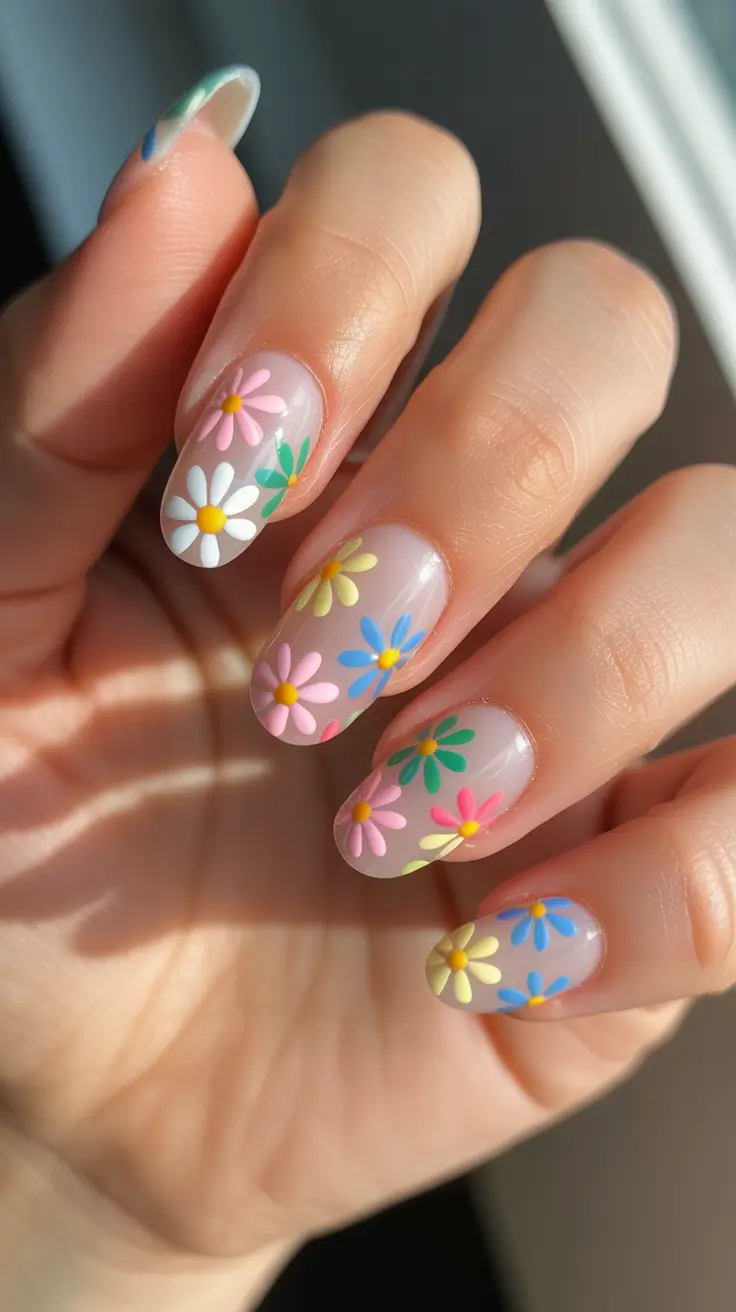
If I’m recreating it, I start with a sheer nude builder or a “your nails but better” base – OPI Bubble Bath is the classic, and Essie Ballet Slippers gives that soft veil effect. For the petals, I’d pull a mini palette: pastel pink, butter yellow, cornflower blue, and leafy green for tiny accents. A dotting tool is the hero here – it makes petals easy without needing pro-level brush control. This is one of my favorite spring gel nails ideas color combos fun moments because the base stays calm while the цвет pops.
Steps-wise, I lay down the sheer base in two coats, then place five dots in a circle for each daisy and a slightly bigger dot in the center (yellow centers keep it sunny). I add tiny green leaf strokes with a detail brush, then seal everything with a glossy gel top coat. If you’re doing gel, flash-cure between flowers so you don’t accidentally smudge your little garden while you’re still working.
I love this kind of manicure for spring weekends when you want to feel put-together without leaning “serious.” It’s also a sneaky confidence boost – like wearing a bright scarf with a neutral outfit. If you’ve been craving fun gel nails ideas spring but you’re nervous about bold colors, this is a safe, pretty gateway.
Confetti Dots With Clean-Girl Polish
This manicure is basically “party nails” that still look polished – a crisp white base covered in evenly spaced rainbow dots. The dot placement is what keeps it elegant: tidy, balanced, and intentionally minimal. It’s playful enough to feel like a mood-lifter, yet simple enough to read chic and graphic. If you like Art designs that don’t require hours of detailing, this one is a win.
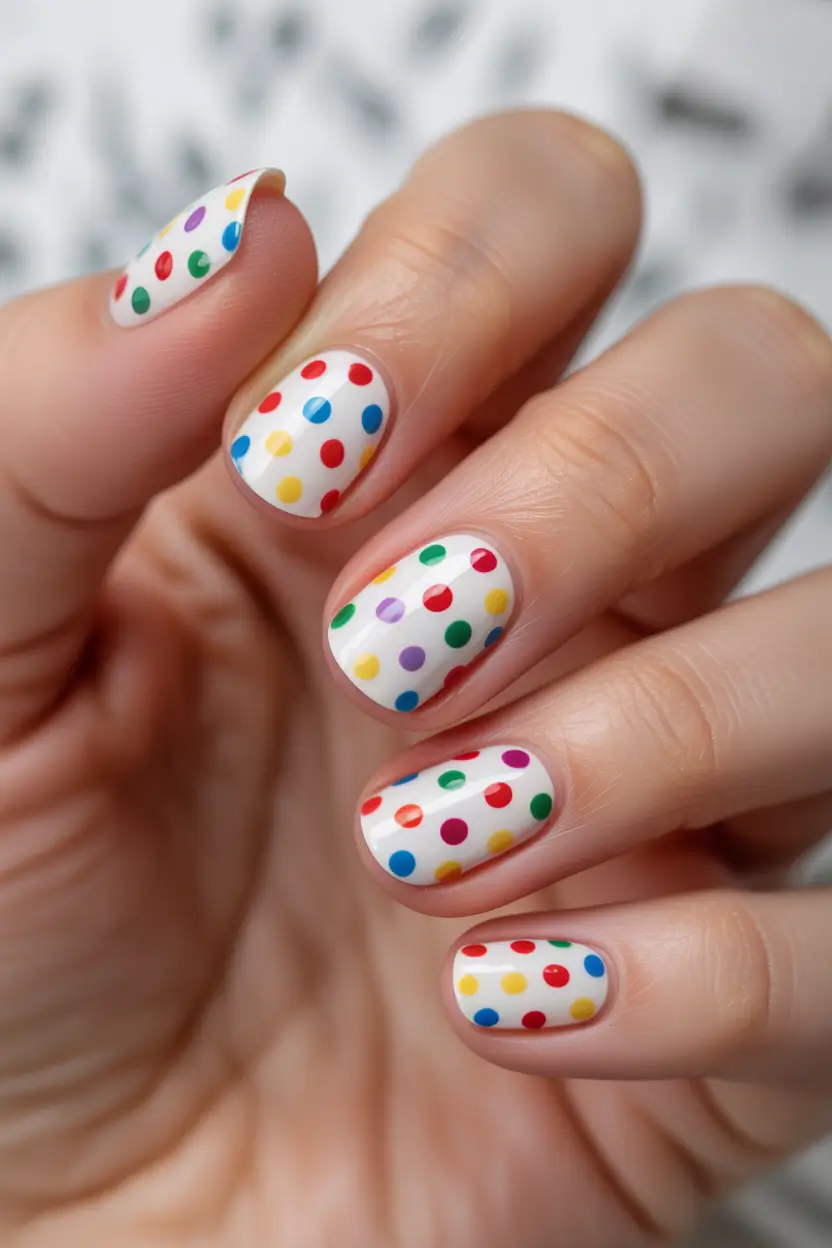
To get it right, I’d use an opaque white like OPI Alpine Snow or Olive & June HD, then pick 4-6 bright shades for dots (red, blue, yellow, green, purple – classic confetti). A dotting tool set helps you keep the circles consistent. This is the kind of look that works especially well on a neat, shorter shape – very fun spring nails short friendly, and it can totally suit Square or softly rounded nails depending on your preference.
My at-home method is two coats of white, then I let it dry longer than I think I need (white loves to dent). After that, I place dots in a loose grid – I try to avoid clustering the same color too close together so the whole manicure looks balanced. Then I seal with a thick glossy top coat to smooth any raised edges. If your dots feel bumpy, you can do a quick “float” top coat layer – don’t press down, just glide so you don’t drag pigment.
This design always makes me feel more energetic, even if I’m wearing something super basic like leggings and a hoodie. It’s one of those fun spring nails ideas that reads happy without being loud – and honestly, that’s the exact vibe I want in spring 2026.
Lavender Bunny Minimal Cute
Okay, this one is adorable in the most controlled way – a soft lavender base with tiny white bunny faces and pink ears. The color choice makes it feel pastel and spring-appropriate, while the clean lines keep it from crossing into “kid manicure” territory. It’s giving playful, but still neat – a perfect example of fun spring nails design that can look surprisingly elevated when the execution is crisp.
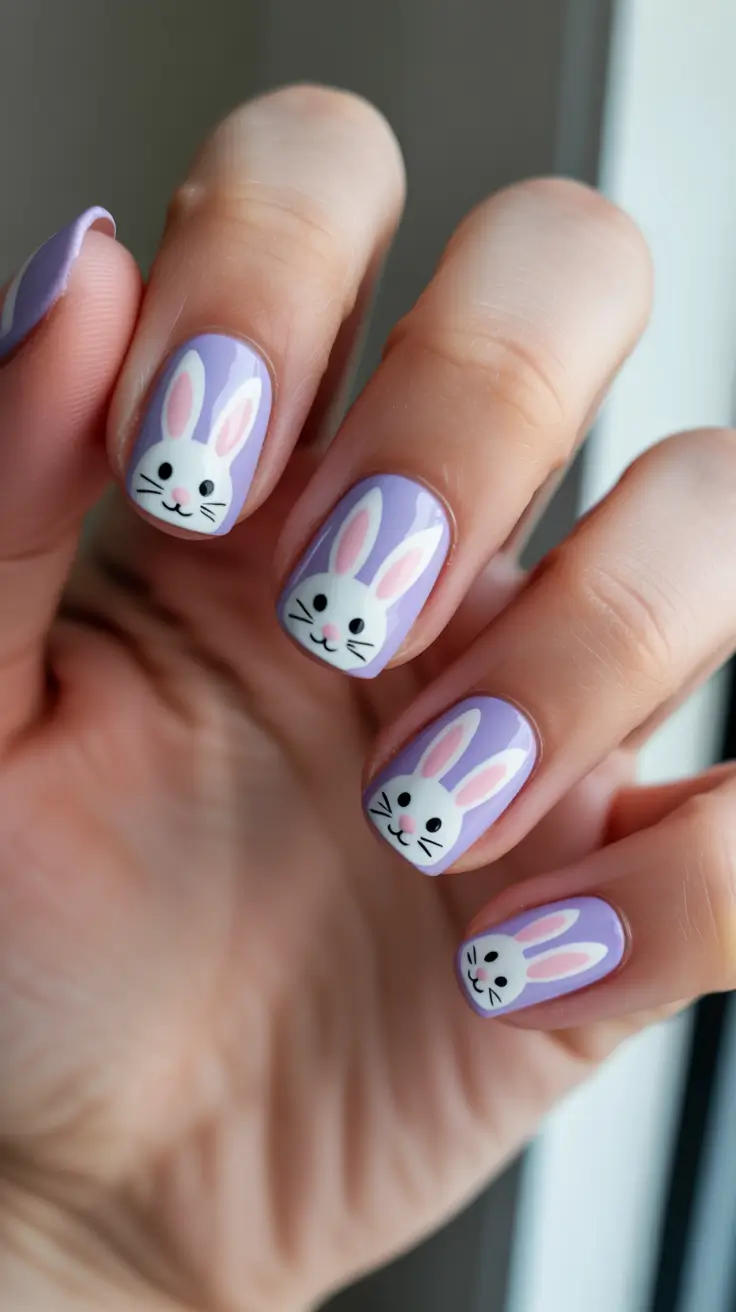
For materials, I’d go with a lavender polish like Essie Lilacism or OPI Do You Lilac It?, plus a true opaque white for the bunny shapes. You’ll want a super-fine liner brush for the whiskers and eyes, and a dotting tool for the nose and cheeks. A high-gloss top coat makes the character details look more “designed” and less hand-drawn. If you’re into Art but you like it tidy, this is a cute challenge without being overwhelming.
If I’m doing this at home, I paint the lavender base first, then I create the bunny head shape with white (think rounded oval). I add two ear shapes, then fill the ear centers with a soft pink. After that, I use a tiny brush or even a nail art pen for eyes and whiskers, keeping everything symmetrical. My personal rule – if a character nail looks “off,” it’s usually because one eye is higher than the other, so I step back and check alignment before I cure or top coat.
This is the manicure I’d wear for early spring events – Easter brunch vibes, a weekend farmers market, or just when you want your nails to make you smile every time you reach for your phone. It’s not trying to be sexy or serious – it’s just charming, and that’s a valid aesthetic.
Sunset French With Daisy Pop
This design feels like the first warm day after a long winter – a soft nude base with bright coral-orange French tips, a little yellow wave detail, and cheerful daisy accents. It’s lively, but still “done,” because the base stays sheer and the art is placed intentionally. If you’ve been craving Colors that feel optimistic, this is one of those fun spring nails design ideas that instantly lifts your whole look.
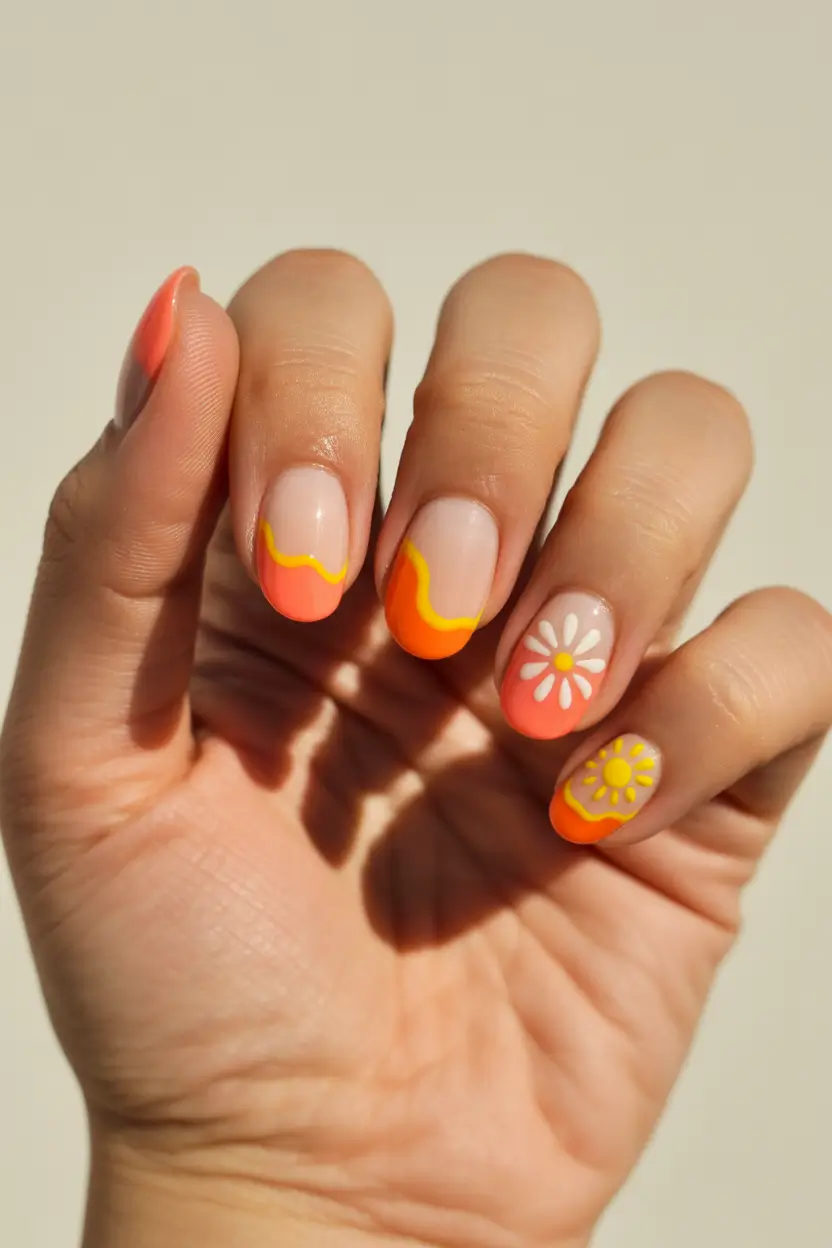
What I’d use: a sheer nude base (OPI Bubble Bath works again, because she’s reliable like that), plus a juicy coral-orange for the tips, and a sunny yellow for the wave lines and flower centers. A thin striping brush helps with the curved French edge and the wave detail. If you’re a gel person, this fits perfectly into fun gel nails ideas spring because those brights look extra saturated under gel top coat.
For the steps, I do the nude base first, then create the coral French tip with a curved line (I like to map it with a thin brush before filling it in). Next, I add the yellow wave – one smooth line that follows the curve, like a little beam of sunlight. The daisies are just dot-petals plus a center dot, then everything gets sealed with a glossy top coat. If you want it extra clean, you can use a cleanup brush with a tiny bit of acetone around the edges before top coat.
I’m obsessed with how wearable this is – it’s fun, but it still pairs with neutrals, denim, even a simple white tee. And if you’re someone who usually plays it safe, this is such a friendly way to try bold spring color without committing to a full neon set.
Skittle-Bright Gel Pop For Easy Spring Confidence
This manicure is the definition of cheerful polish with a clean, elegant finish – each nail gets its own bright shade, and the glossy surface makes everything look intentionally “done,” not random. I love how the shape stays softly rounded (almost almond-leaning), so even with bold tones, it doesn’t feel loud. If you’re collecting fun spring nails ideas, this kind of color-blocked set is a no-brainer because it’s playful without needing extra Art.
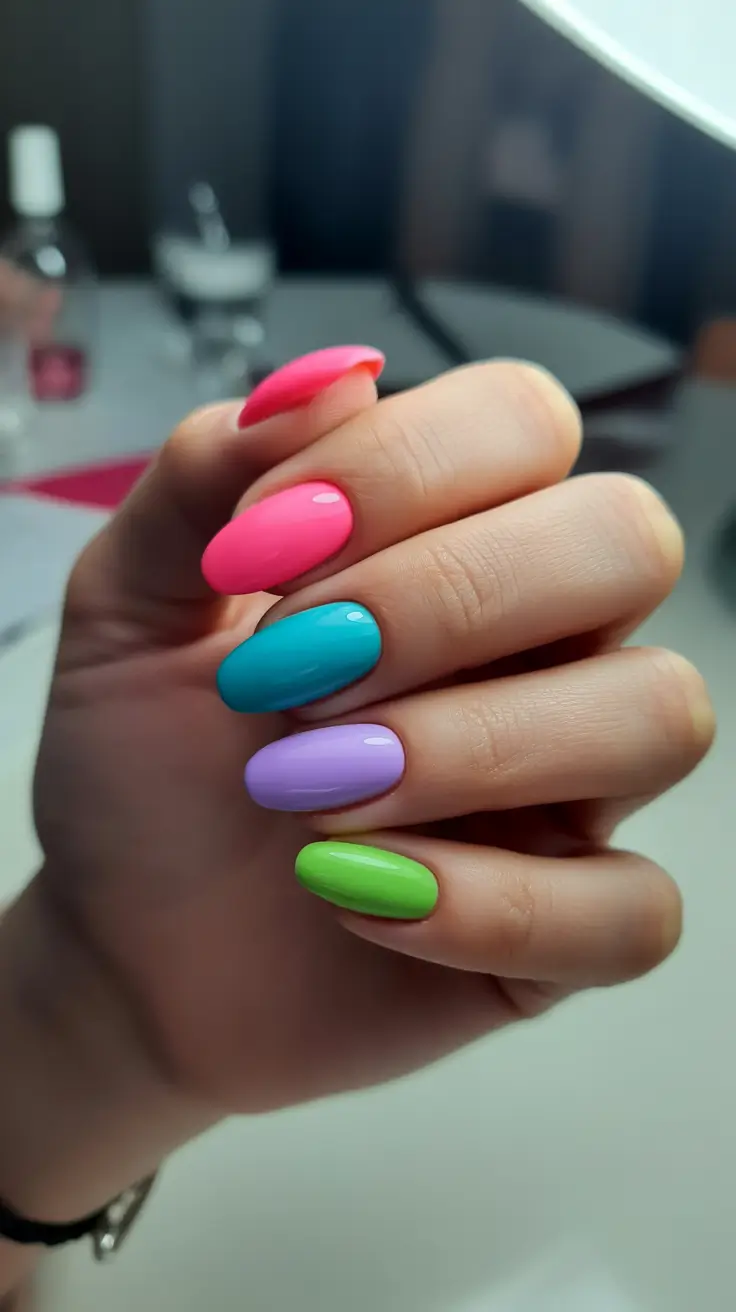
To recreate it, I’d pick four or five high-saturation gels: hot pink, teal-blue, lavender, and lime green. Brands like DND and OPI GelColor both do this “creamy neon” look really well, and a shiny top coat is what gives it that smooth, candy-like reflection. This is a perfect example of spring gel nails ideas color combos fun – it’s all about Colors that contrast but still look harmonious.
My at-home steps are simple: prep, base coat, then two thin coats of each color (curing between coats), and finish with a thick top coat sealed along the free edge. When you’re mixing brights, I swear by thin layers – thick coats can make the surface look uneven, and that’s what turns “cute” into “messy” fast. If you want the easiest “salon” upgrade, lightly buff the nail before base coat so the shine looks extra glassy.
If I’m being honest, this is the set I choose when I’m bored of neutrals but still want something that feels clean and wearable. It’s the kind of fun gel nails ideas spring moment that makes you look down at your hands and immediately feel more awake.
Rainbow Accent With Hot Pink Almond Drama
This set feels like spring energy with a little attitude – hot pink almond nails paired with a soft blush nude, plus that crisp rainbow accent that steals the show. The rainbow arc looks smooth and glossy, like it was painted with patience, and the nude base keeps the whole look from tipping into “too much.” It’s bold, but still polished enough to count as fun spring nails that can work for real life.

For materials, I’d use a hot pink gel (DND has iconic brights) and a sheer milky nude for the softer nails. The rainbow can be done with striping gels or even a thin liner brush and five mini color pots – red, orange, yellow, green, and blue. This is the kind of fun spring nails design where a steady hand matters more than fancy tools, but striping brushes make it easier.
My process would be: paint and cure the base colors first, then do the rainbow on the accent nail over the nude base. I like to start with the lightest stripe (yellow) and build outward so the lines don’t get muddy. A quick pro-level trick I’ve learned over time – wipe your brush often and keep the gel super thin, because thick stripes will “float” under top coat and lose that clean edge.
This is one of my favorite “compliment magnet” looks because it reads like Design with intention. And if you’re nervous about rainbow, doing it on just one nail is the easiest way to dip in without committing to a whole theme.
Pastel Chick Art On Short Square Nails
This one is pure cute-meets-neat – short square nails with pastel blocks and one tiny chick face that feels playful but still clean. The mint green, soft pink, and lavender tones are classic spring, and the white nail with pink dots gives it that sweet retro vibe. If you’ve been hunting for fun spring nails short that still look tidy, this is a perfect template.
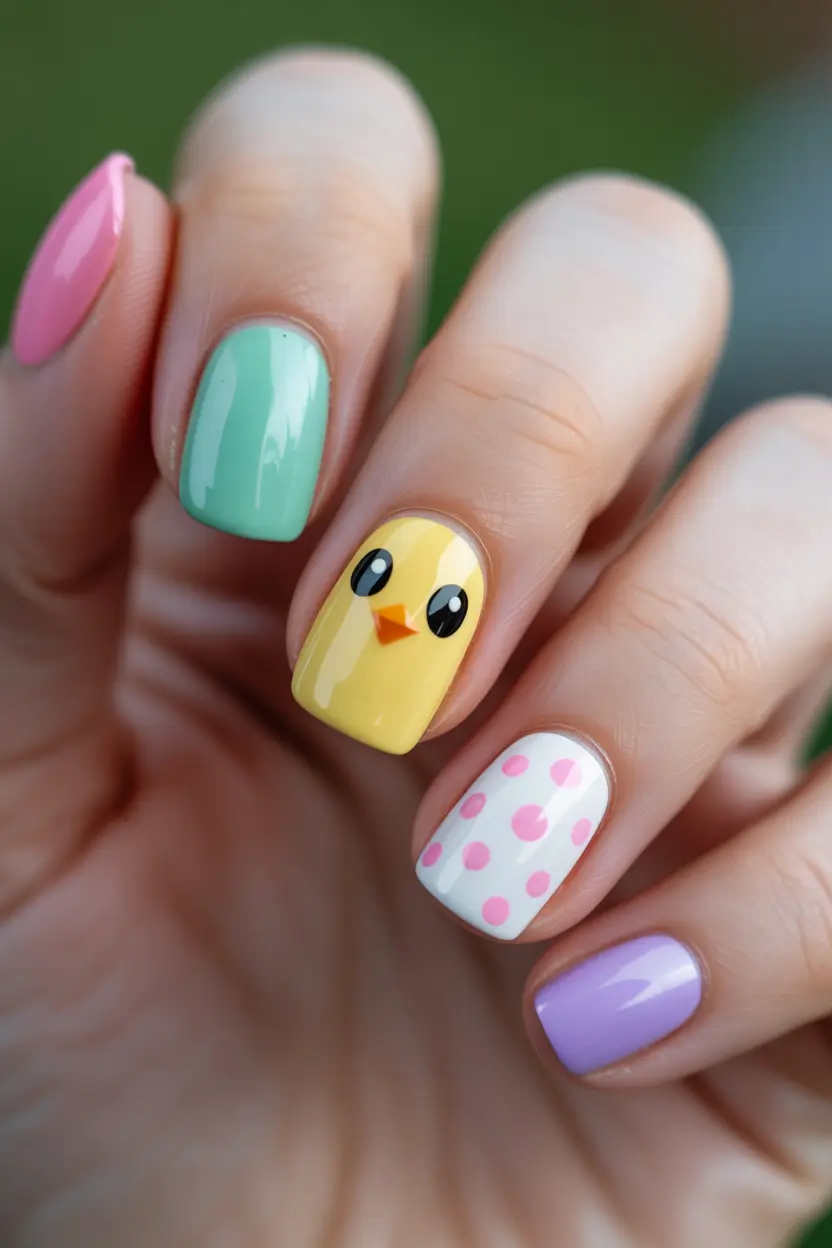
You’ll want pastel gel shades (mint, lavender, blush pink), plus a buttery yellow for the chick, and black + white detail gels for the eyes. A dotting tool is the secret weapon for the polka dots, and a tiny liner brush helps keep the chick’s beak sharp. This absolutely fits fun spring nails design short square and fun spring nails square because the short shape keeps the art looking crisp instead of crowded.
At home, I’d paint each base color and cure, then do the white dotted nail next so the pink dots sit bright and clean. For the chick, paint the yellow base, cure, then add the eyes (black dots with tiny white highlights) and finish with a small orange triangle beak. Seal everything with top coat, and don’t forget to cap the edge – short nails chip less, but crisp art deserves protection.