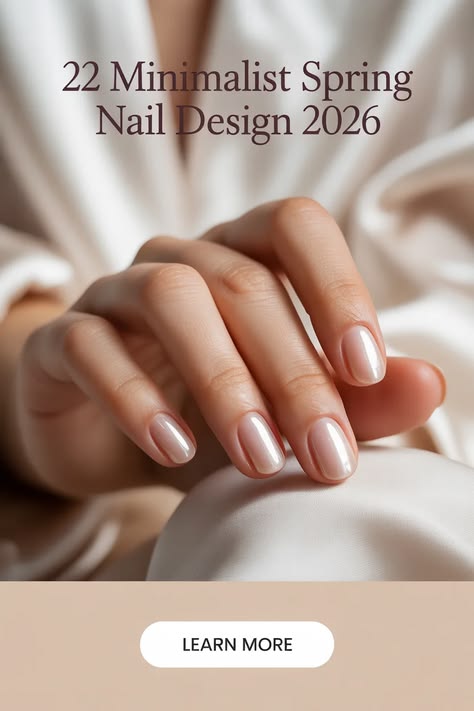
Minimalist Spring Nail Design 2026 – Simple Ideas With A Fresh, Clean Finish
Spring always makes me want to simplify – not in a boring way, but in that fresh, clean, “everything feels lighter” way. Have you noticed how the right manicure can suddenly make your whole week feel more put-together, even if you’re still living in sweaters and iced coffee habits? In this article, I’m breaking down minimalist nail designs for 2026 that feel modern, airy, and completely wearable – the kind of looks that work for real life, not just a perfect Instagram moment.
We’re talking soft pastels, crisp lines, tiny details that look intentional, and easy color stories that flatter every outfit. I’ll walk you through what each design is really about, what you’ll need to recreate it at home, and the little technique tweaks that keep minimalist nails looking polished instead of plain. Ready to find your next go-to spring set – Simple but still Trendy?
Pastel Side-French Almonds That Still Feel Minimal
Soft pastel color blocking is my favorite way to do spring nail designs without going full maximalist. Here I’m seeing long, tapered tips that read like an almond silhouette, with a clean nude base and crisp pastel panels in baby blue, butter yellow, and a whisper of pink – it’s playful, but the negative space keeps it airy and grown-up. If you want spring nail designs almond shape with a light, modern vibe, this is exactly the lane.
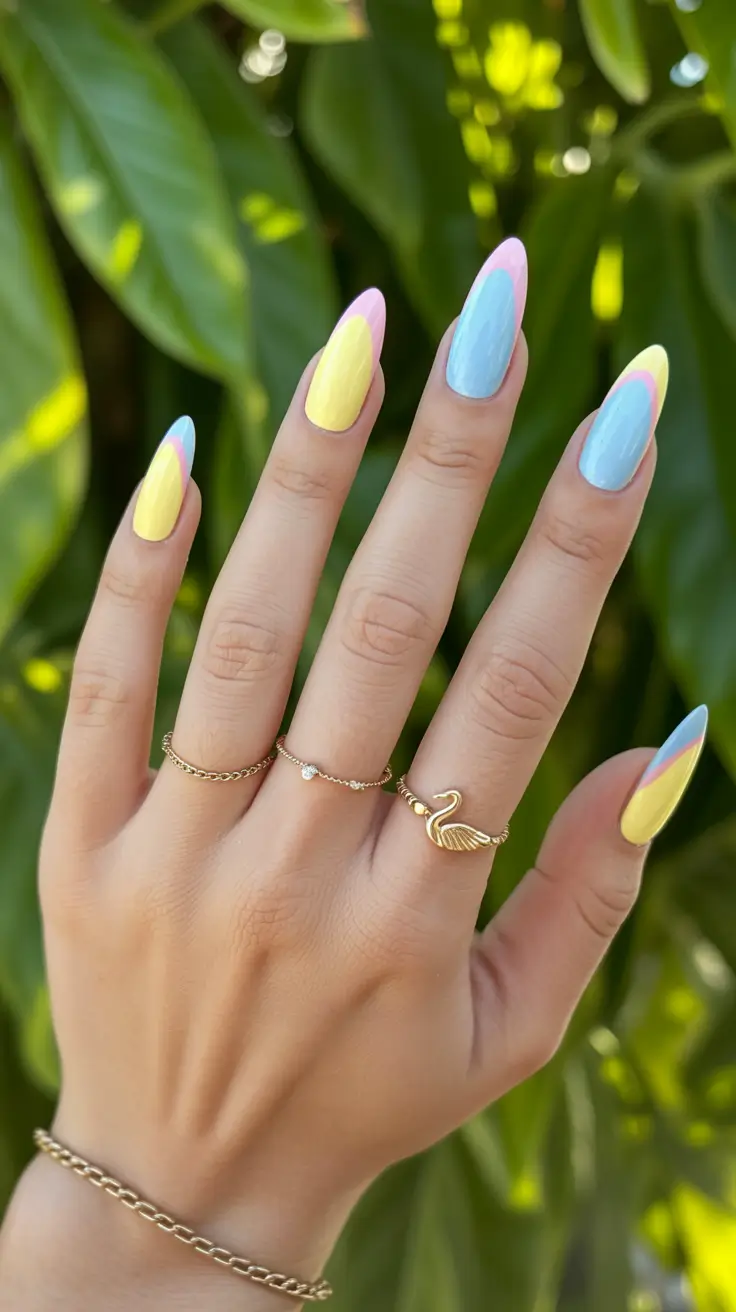
For materials, I’d grab a sheer nude base (think “your nails but better”), plus pastel gel shades in Yellow and sky-blue, and a milky pink. This look is easiest with spring nail designs gel because gel gives you that smooth, glassy finish and lets you clean the edges before curing. A fine liner brush is the real hero for making those color borders look intentionally sharp.
The at-home trick is to paint your nude base first, cure, then map the pastel panels lightly with a thin brush. I do one color at a time, cure between, and use a tiny detail brush dipped in remover to perfect the curve so it stays minimalist instead of messy. When everything looks balanced, I seal it with a glossy top coat pulled over the edges so the tips stay crisp for longer.
Honestly, this is the manicure I’d wear when I want a little “spring mood boost” but still want to look polished at the coffee counter. If you’ve ever thought pastels feel too sweet, this layout changes the whole story – it’s clean, graphic, and quietly Trendy.
Powder Blue Daisies With A Clean, Calm Finish
There’s something so soothing about a single-color base with one tiny motif – and these daisies are doing that “minimal but cheerful” thing perfectly. The base is a cool periwinkle-blue, and the white petals with a sunny center keep it fresh without turning into a full-on art project. If you want spring nail designs simple that still feel special, this is a sweet spot.
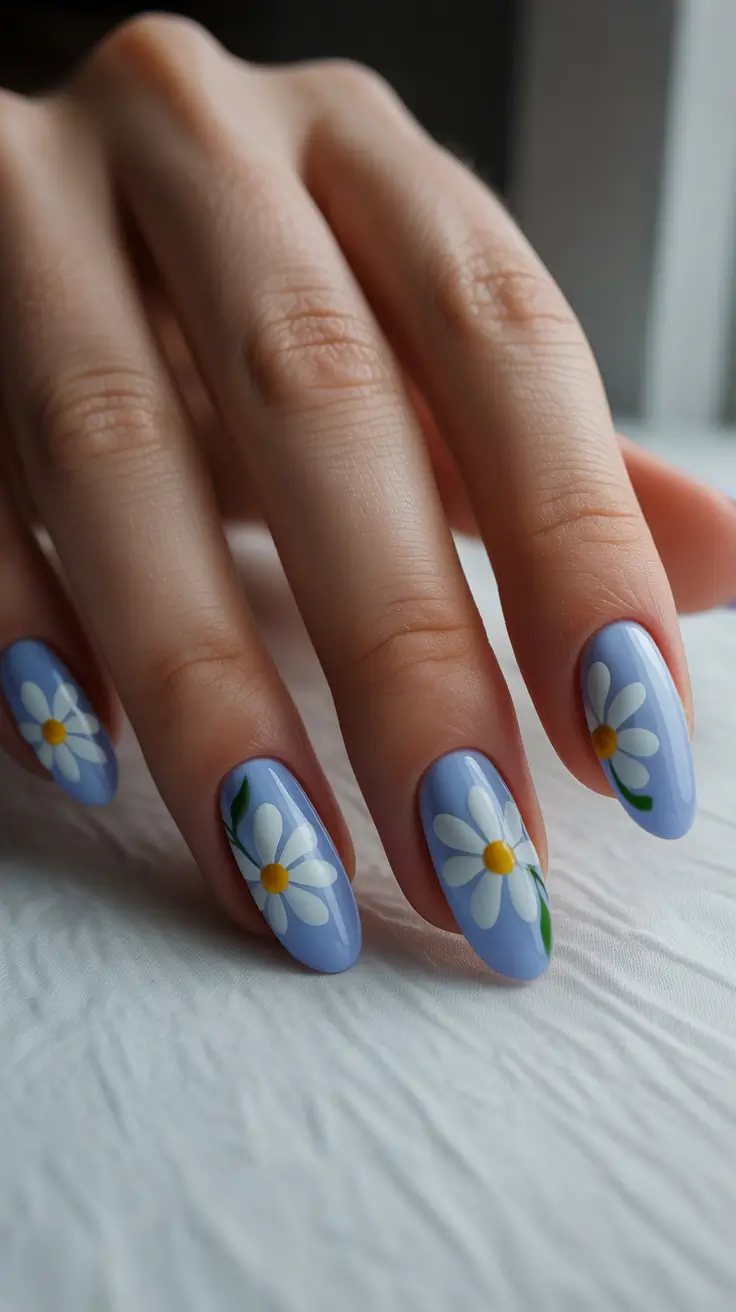
I’d use an opaque gel in a soft blue, plus white and a small pop of yellow for the flower centers. A dotting tool (or even a bobby pin tip) makes the petals way easier, and a super-fine brush helps with the tiny green stem detail. This is one of those Gel looks where the curing time makes nail art feel less stressful.
When I recreate this at home, I paint the blue base, cure, then add the daisy center dot first. After that, I dot petals around it in a loose circle – perfection isn’t the point, symmetry is. Top coat last, and I float it over the design gently so I don’t drag the white into the blue.
This is the manicure I’d pick for early spring weekends when you’re in a hoodie but the air smells like flowers anyway. It’s Cute without being loud – and yes, people will ask where you got it done.
Sage And Nude Minimal Dots With A Soft Almond Vibe
This design is minimalism with a little wink – a sheer nude base, soft sage-green accents, and tiny dotted lines that feel almost like jewelry. The shape reads gently elongated and rounded, which makes it a great reference if you like minimalist nail designs that still flatter the hand. The color combo also screams fresh leaves and warm sunlight, very “spring reset.”
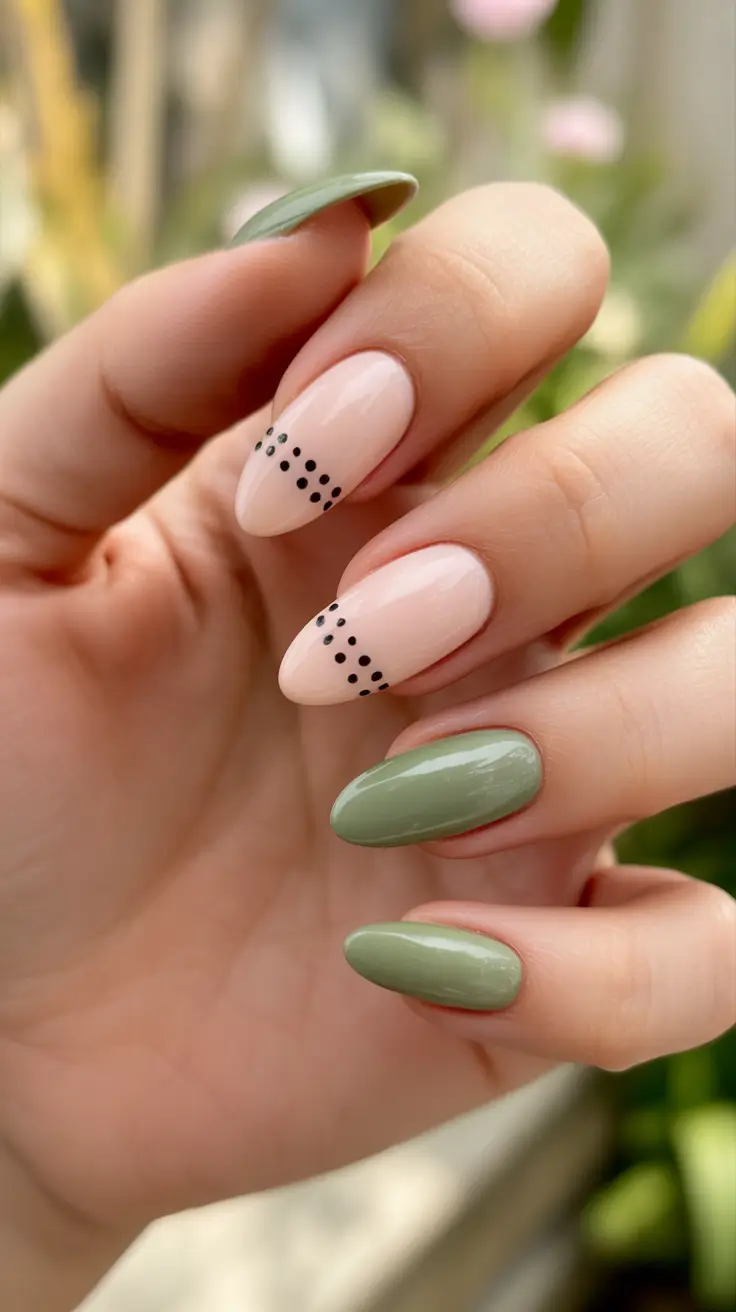
For supplies, I’d go with a sheer nude builder or base, a muted sage for the solid nails, and a black dotting gel or art pen for the dots. This can be done in gel or regular polish, but gel helps keep the dots crisp instead of bleeding. If you’re trying to hit minimalist nail design simple, keep the dots small and the spacing consistent.
At home, I’d apply the nude base and cure, then paint the sage nails fully. For the dotted detail, I place the dots in a tidy diagonal trail near the sidewall – the placement matters more than the number. Finish with a glossy top coat, and cap the free edge to prevent early chips.
I love this for days when I’m wearing neutrals and want my nails to look intentional, not “I tried too hard.” It’s basically minimalist nail design inspiration for anyone who wants calm colors but still wants a detail that feels modern.
Green Wave Lines For A Minimalist City-Spring Moment
This one is so clean and graphic – solid green nails paired with a milky neutral base on the accent nails, topped with thin wavy lines. The line work makes it feel artsy, but it still reads minimalist because the palette stays controlled. If you’re hunting Green ideas that aren’t floral, this is such a cool direction.
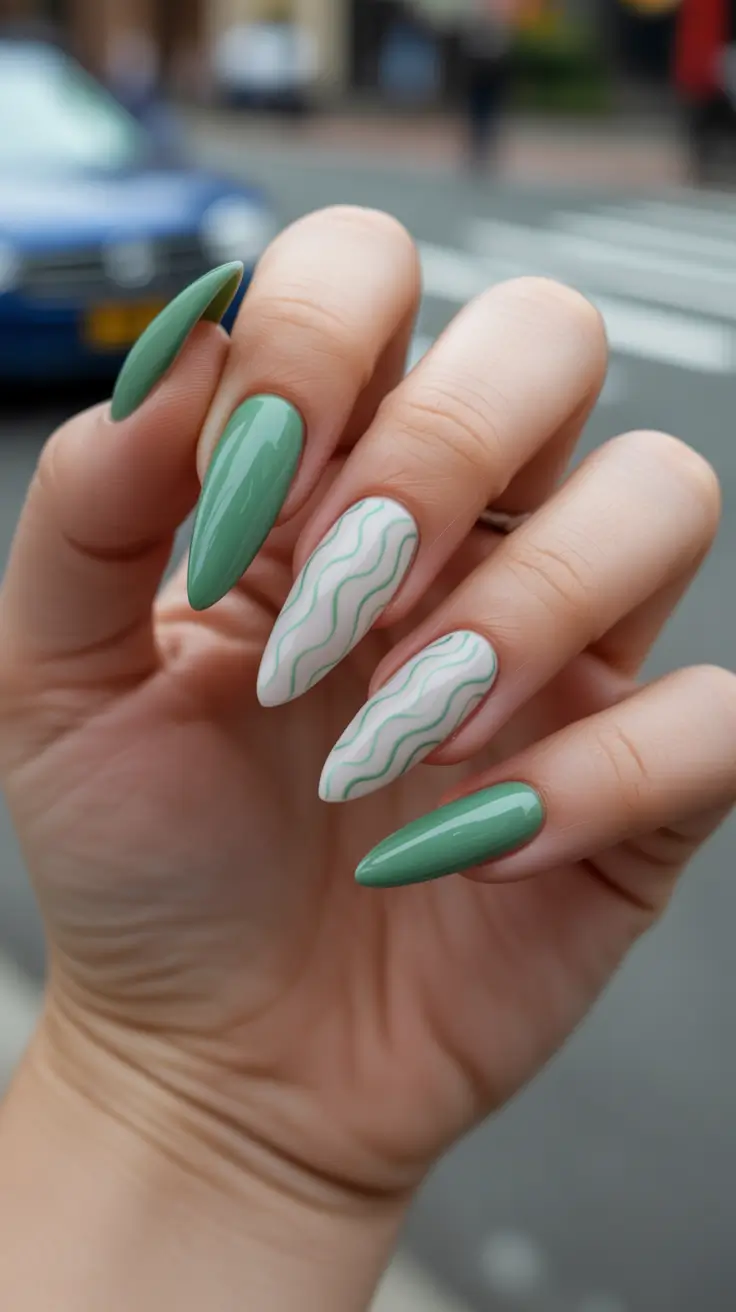
I’d use a glossy medium green gel and a sheer milky base, plus a striping brush for the waves. If you want a softer vibe, swap the green for Light green and keep the lines thin. A smoothing top coat helps the accent nails look like glass, especially if your striping gel sits slightly raised.
The easiest method is: base, cure, paint the green solids, cure, then do the neutral accent nails. Once cured, draw the wavy lines in one confident stroke per line – I always rest my hand on the table to keep my brush steady. Seal everything with top coat, and cure fully so the lines don’t smudge.
This feels like the manicure equivalent of a crisp white tee and great jeans – simple, reliable, but still stylish. If you’re new to minimalist art, this is a friendly “first design” that looks way more advanced than it actually is.
Blue And Pink Micro-French With A Glossy Minimal Edge
A micro-French is basically the minimalist girl’s secret weapon, and this version adds the tiniest pop of color with layered blue and pink curves. The base stays sheer and natural-looking, so the design feels light and wearable even on longer nails. If you want spring nail designs gel that look salon-clean, this one delivers.
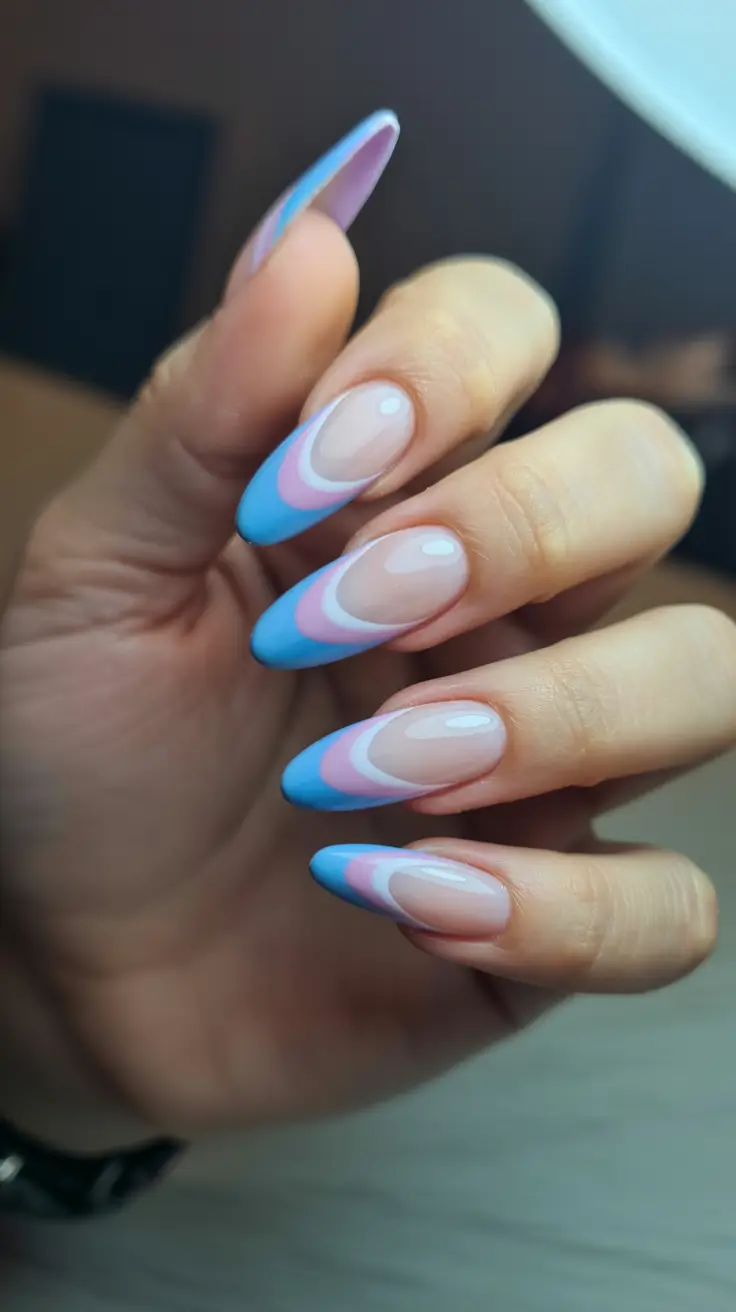
I’d use a sheer nude base, then a bright-but-soft blue and a pale pink for the curved tips. A thin liner brush makes the swoop easier than trying to do it with the polish brush. This can also be adapted into spring nail designs short by shrinking the curves and keeping the color closer to the free edge.
For the steps, I apply the base, cure, then sketch the curve lightly in pink first, cure, and trace a second curve in blue just beneath it. Doing it in layers keeps the lines from getting thick, which is what can ruin the minimalist vibe fast. Top coat last, and make sure you cap the edges so the tips stay glossy.
This is the kind of manicure I’d wear when I want my hands to look extra put-together – like I’m about to run errands, but I might accidentally end up at brunch. Tell me honestly – would you wear this as-is, or would you swap the blue for Yellow to make it even more springy?
Mint And Blush Alternating Almond Minimalism
I love how this set balances two pastel moods without getting loud – a milky blush pink paired with a soft mint that reads like Light green in the sweetest, most wearable way. The shape is almond, sleek and slightly elongated, so even with simple color-blocking it looks intentional – very spring nail designs almond shape, very “clean girl, but make it seasonal.” The shine is glassy, and the colors feel airy, like cotton candy that grew up.
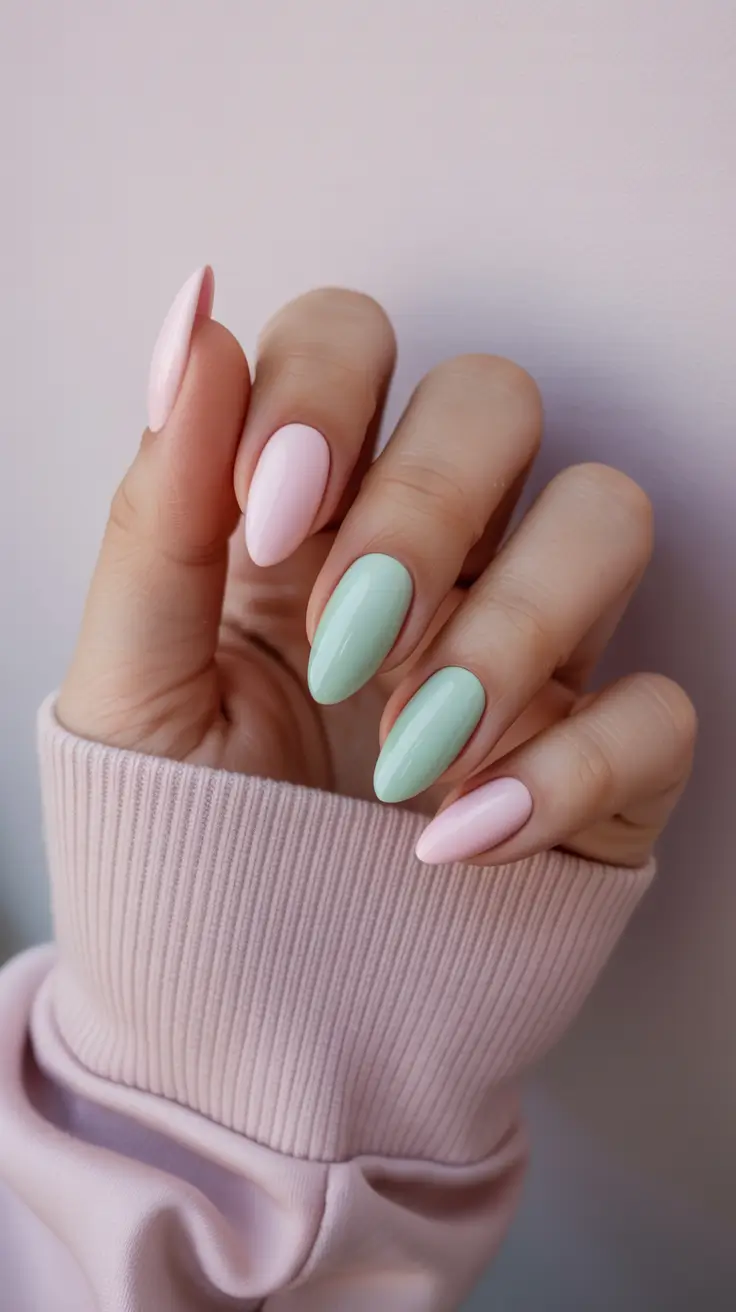
Here’s what I’d use to recreate it: a strengthening base (I’m loyal to OPI Nail Envy when my nails are acting delicate), then two opaque-but-creamy shades – one sheer baby pink and one pastel mint. For polish lines, you can do this with Gel if you want that “doesn’t chip when I open boxes” durability – think Aprés, Gelish, or DND – or with classic lacquer if you’re patient with dry time. The key is picking pastels that look slightly “milky,” not neon.
At home, I’d prep like I mean it – push back cuticles, lightly buff, cleanse with alcohol, then base coat. Paint the pink on thumb, index, and pinky; paint the mint on middle and ring, curing (or drying) between coats. Two thin coats beat one thick coat every time – less streaking, less bubbling, more that salon-smooth finish. Finish with a glossy top coat and cap the free edge so the tips don’t start peeling first.
My take – this is the manicure I’d choose for weeks when I’m wearing neutral outfits and want my nails to feel like a subtle accessory. It’s Simple, it’s Cute, it’s very “fresh manicure energy” without any complicated art. If you’re collecting Ideas for spring nail designs gel, this one is basically a starter pack.
Olive Micro-French With Nude Negative Space
This is the kind of minimalist design that makes people lean in a little closer – and that’s the point. A couple nails are fully coated in a muted olive green, while the others keep a nude base with a crisp green micro-French line that hugs the tip. It’s clean, graphic, and still soft because the green is earthy, not bright – very Green, very modern, very Trendy for spring 2026.
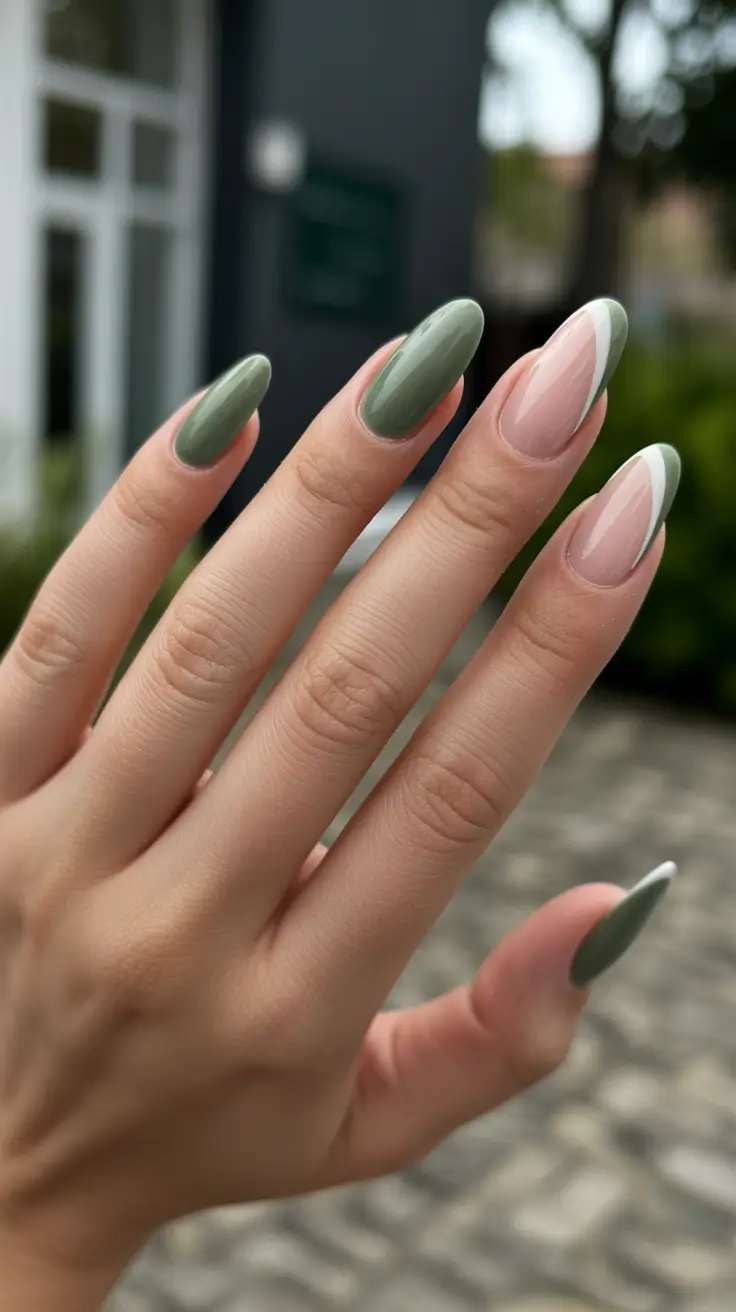
To get this look, you’ll want an even-toned nude base (something close to your skin tone but slightly perfected) and an olive gel or polish with good opacity. If I’m doing it at home, I prefer gel for the micro-French because you can take your time before curing – it’s easier to perfect the line. A thin nail art brush or a striping brush is non-negotiable here, plus a super glossy top coat that makes the whole design look crisp.
My DIY steps are: prep + base, then one to two coats of nude on the “French” nails, cure, and add the olive to the full-coverage nails. For the micro-French, I paint a thin curved line at the edge – the trick is using the brush almost sideways and doing it in two short strokes rather than one shaky long one. Seal it all with top coat, and don’t forget to wrap the tips.
Real-life note – this is my go-to when I want spring nail designs simple but I’m bored of plain nude. It reads polished at work, but it also looks cool holding an iced matcha. If you’ve been saving minimalist nail design inspiration, this is one of those sets that never looks “too much,” even on days you feel low-key.
Milky Nude Almond With One Botanical Accent
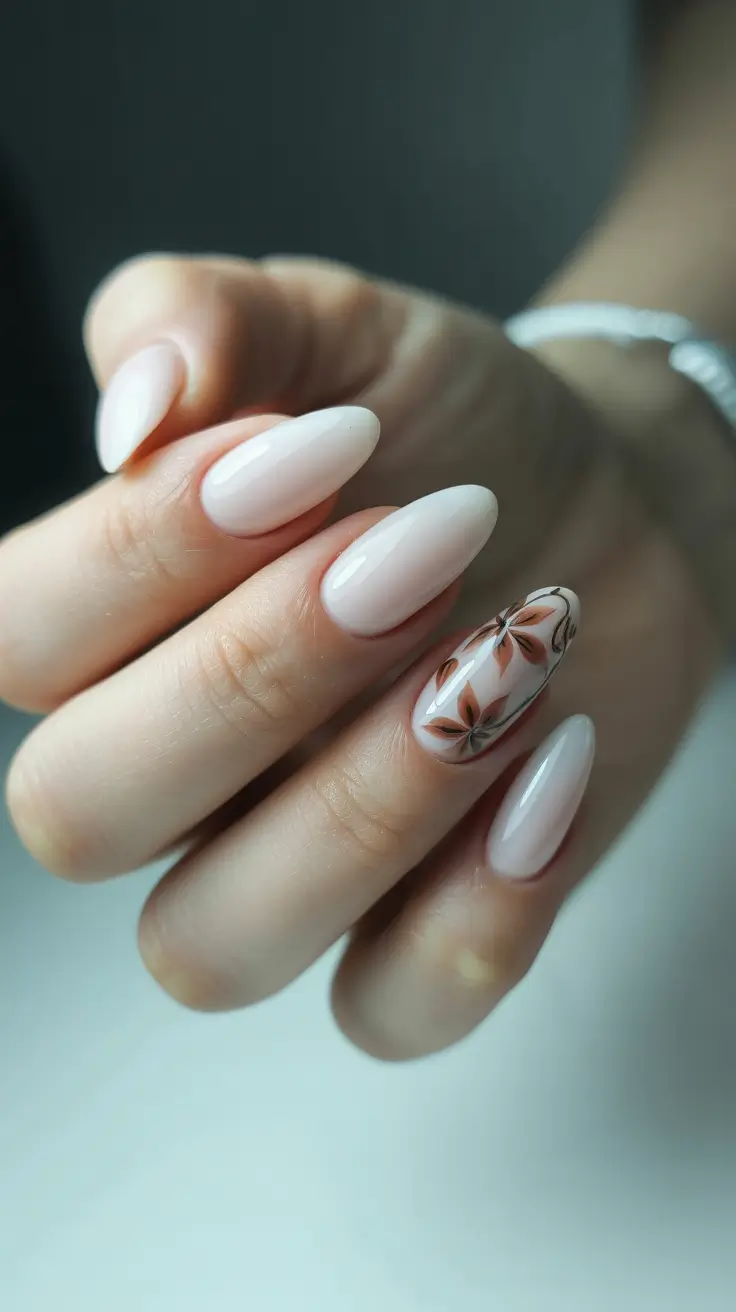
For materials, I’d grab a milky nude base gel (builder in a bottle works beautifully if you want structure), a thin liner brush, and a brown gel paint or art gel for the leaves. If you’re not into freehand, nail stickers or decals can give the same effect – just press them down smoothly and seal well with top coat so edges don’t lift. This is also a great moment for a high-gloss top coat that levels itself.
At home, I do the nude first and make it perfect – because the accent looks better when the base is flawless. After curing the nude and top coating (optional but helpful), I add the leaf lines with the thinnest brush I have, cure, then top coat again. The goal is “delicate,” not “busy,” so fewer leaves win – one little branch moment is enough.
Personally, I love this for early spring events – brunch, a baby shower, a casual wedding weekend where you want elegance but not sparkle. It’s also an easy bridge if you’re moving from winter neutrals into lighter looks. If you tend to like spring nail designs almond but you want something more personal, this accent idea hits that sweet spot.
Sage Short Nails With Clean White Striping
Short nails can look insanely chic when the finish is glossy and the design is intentional – and this set proves it. The base is a muted sage green, and each nail has a clean white stripe detail that feels graphic but minimal. It’s the type of manicure that looks neat from far away and interesting up close – very spring nail designs short, very wearable, very “I have my life together” energy.
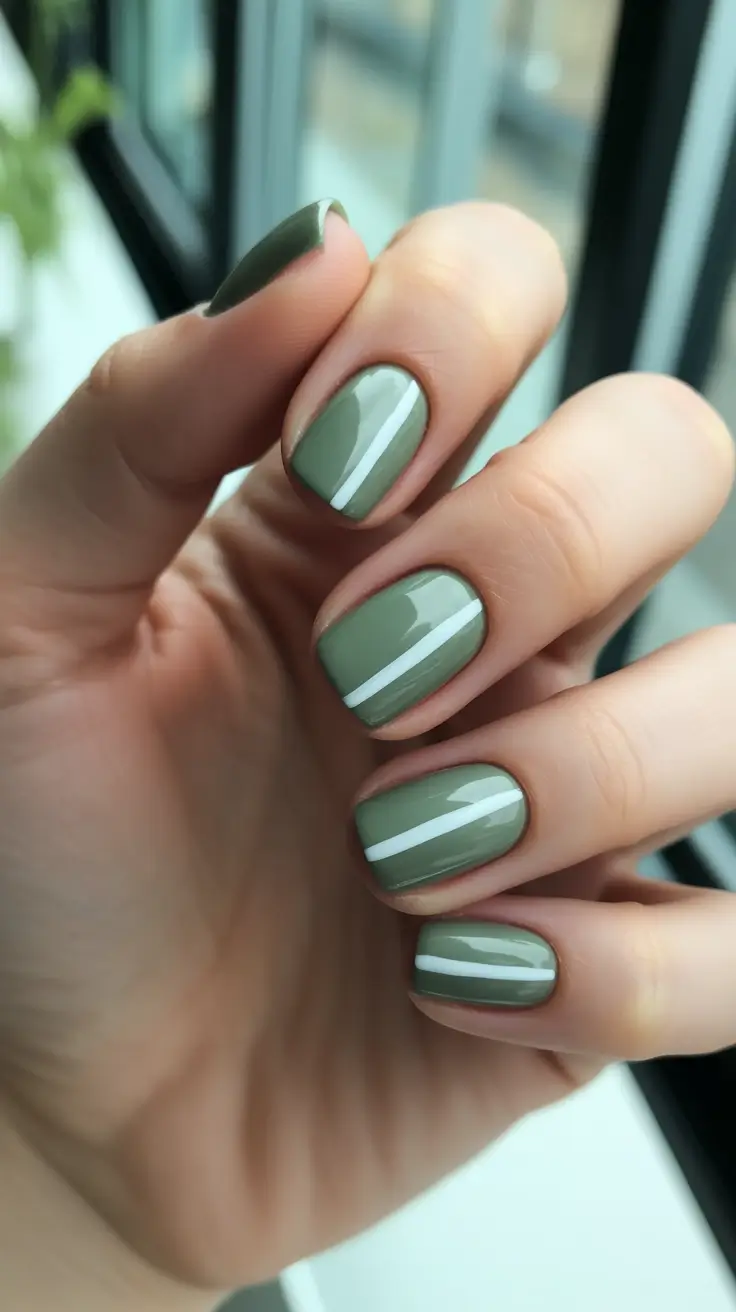
If you want to recreate it, you’ll need a sage gel/polish, a white striping gel (or a highly opaque white), and either striping tape or a thin liner brush. For spring nail designs gel, I like using a striping brush because you can make the lines slightly varied and still crisp. Finish with a glossy top coat – matte would look cool too, but glossy makes it feel fresher for spring.
My process at home is: shape the nails into a neat short squoval, prep, base coat, then two coats of sage. Once that’s cured/dry, I add the stripes – either by placing striping tape and painting over it, or drawing the lines freehand with a thin brush. Peel tape before curing if you’re using gel paint over it, then top coat and cap the edges.
This is one of my favorite minimalist nail designs short options because it doesn’t feel “basic,” but it also doesn’t fight with outfits. If you’re someone who loves Simple looks but still wants Ideas that feel current, this is the kind of set that photographs well and lives well – typing, cleaning, cooking, all of it.
Peach Pastel Set With A Lavender Pop
Okay, this one is the pastel lover’s version of minimalist – soft peach dominates, with one lavender nail and one baby pink nail to keep it playful but still tidy. The finish is glossy, the edges are clean, and the overall vibe feels like spring sunlight hitting your hands through a window. It’s sweet without being childish, and it’s a great gateway into color if you usually live in neutrals – hello Pink, hello “soft mood.”
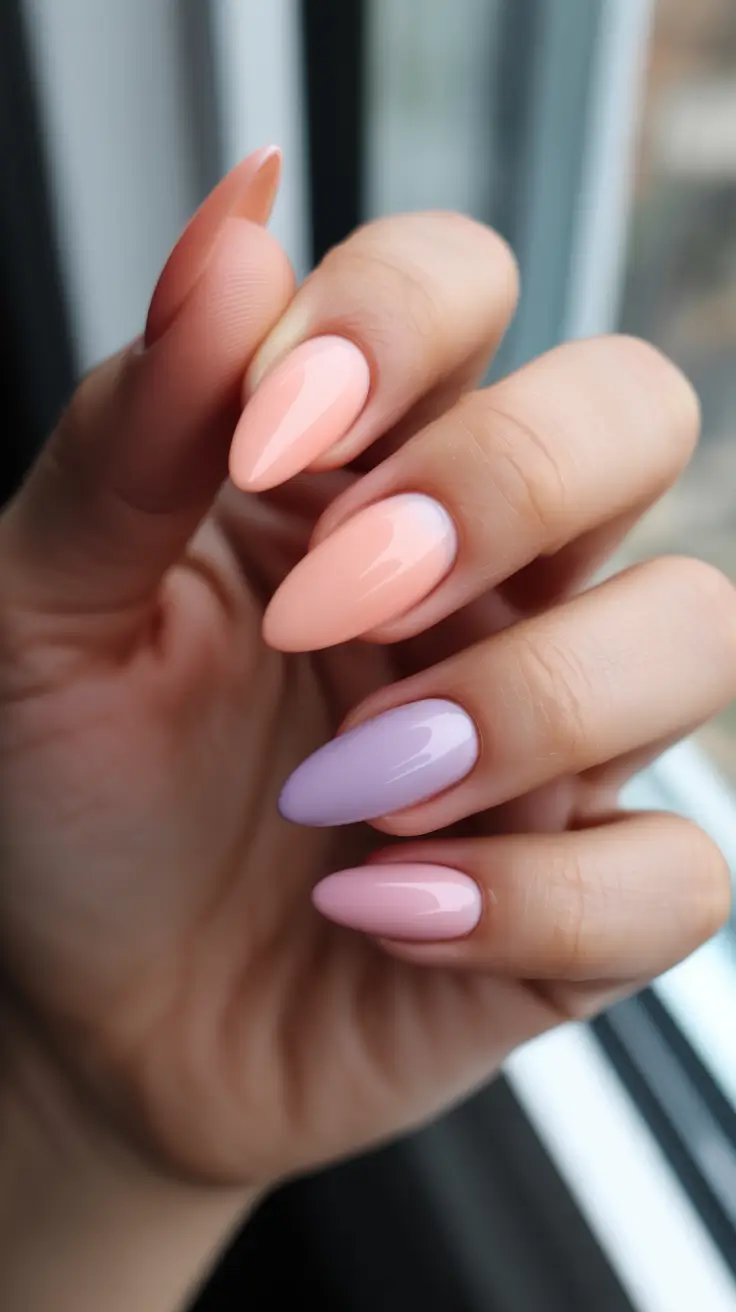
To recreate it, you just need three creamy pastels that sit in the same softness family: peach, lavender, and a pale pink. If you’re doing gel, go for shades that self-level (it makes the finish look more salon-like). I’d also use a sticky base coat for adhesion and a top coat with strong shine – because pastels look best when they’re glossy and smooth.
My at-home steps: prep + base, then paint two thin coats of peach on most nails, curing between coats. Add the lavender on one accent nail and the pink on another – I like spacing accents so they feel balanced, not random. Top coat everything, cap the tips, and add cuticle oil at the end so the whole manicure looks fresh, not just “painted.”
If you’re saving minimalist nail designs pink vibes but you want it to feel spring-specific, this is such an easy yes. It’s Cute, it’s Trendy, and it gives you that “new season, new energy” feeling without needing any nail art skills. Quick question – would you wear the lavender accent on your ring finger, or are you more of a middle-finger accent girl?
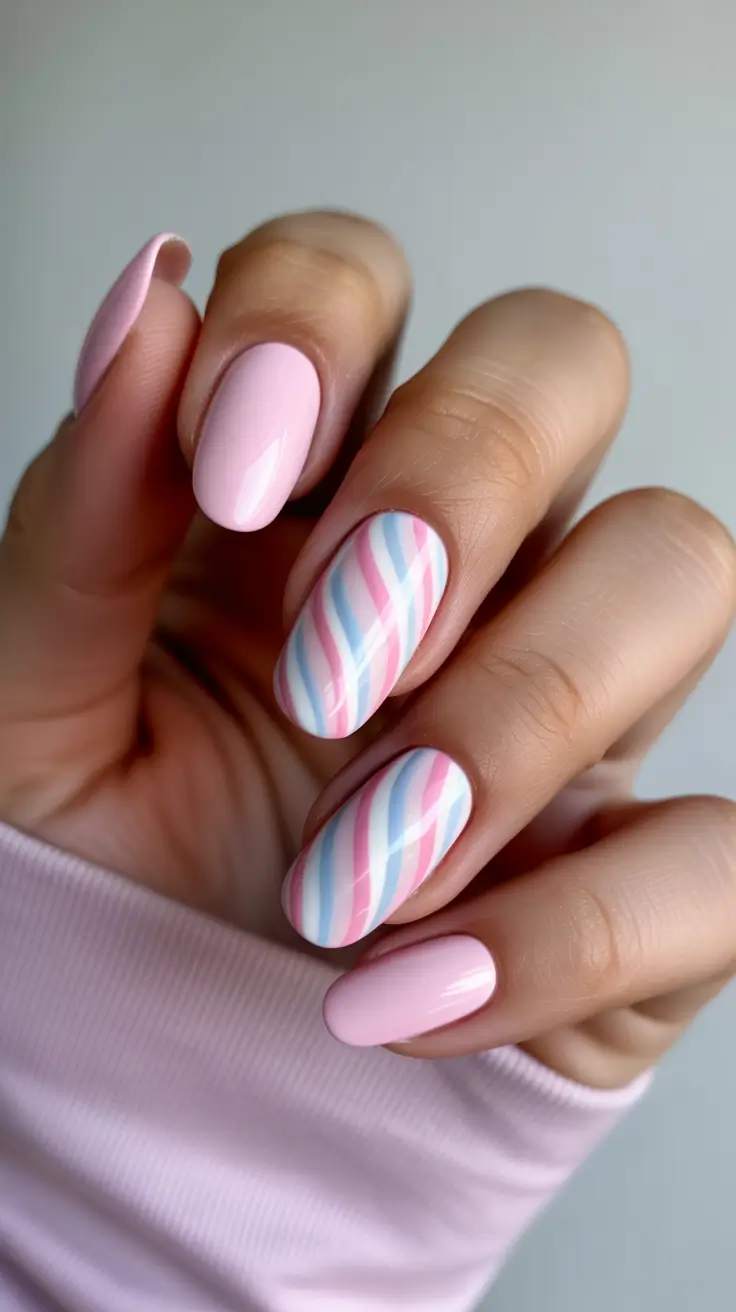
Pastel Candy Stripes With A Minimalist Spring Twist
Something about these soft, evenly spaced stripes feels like spring morning calm – a creamy base with alternating bands of blush Pink and a cool mint that reads close to Light green, kept super tidy so it still lands as minimalist nail designs. The shape is gently elongated and clean, and the pattern is playful without turning loud – basically the definition of spring nail designs simple when you want color but not chaos.
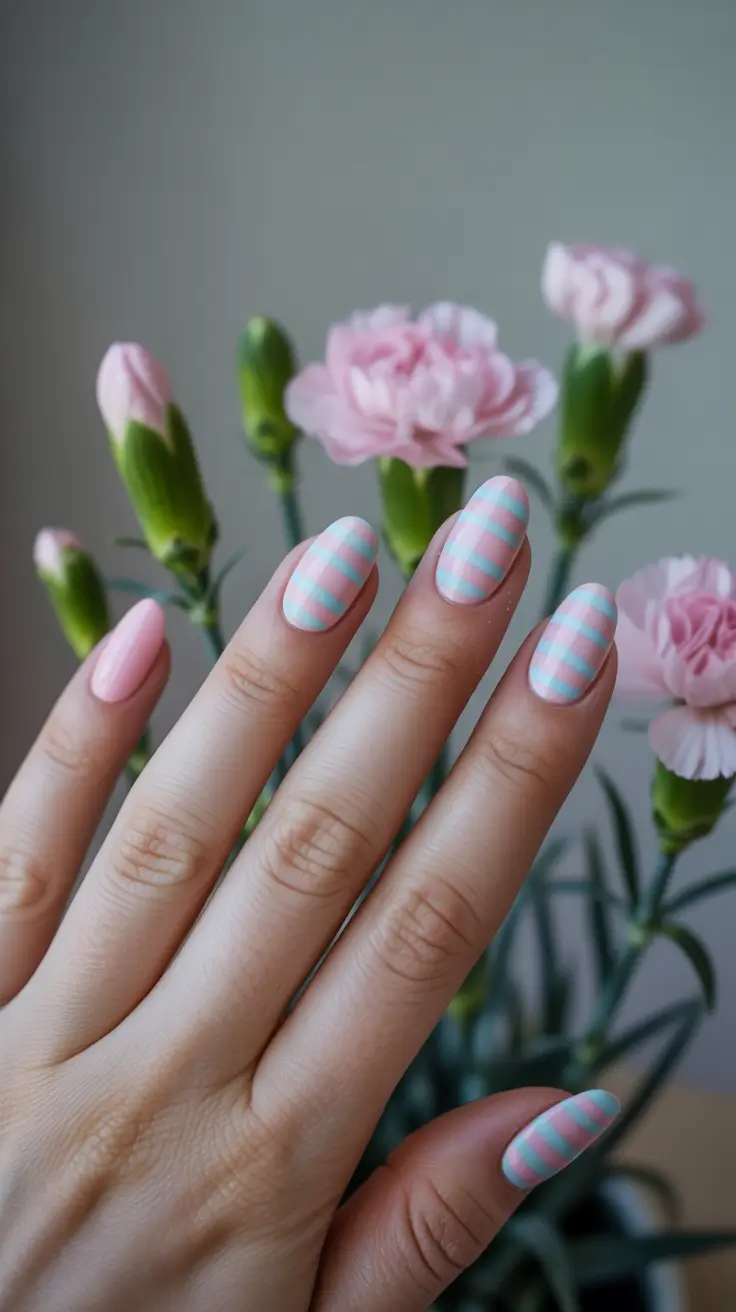
For materials, I’d use a smoothing base coat, then two pastel gels: a milky pink and a minty pastel (any “seafoam” family shade works). Striping tape is optional, but a thin liner brush plus a steady hand is usually enough. This sits perfectly in the spring nail designs gel category because gel keeps stripes crisp and gives you time to correct lines before curing.
When I do stripes at home, I paint the base color first and cure, then I map the stripe spacing lightly with a detail brush. I paint one color stripe at a time and cure quickly so nothing smears, then I alternate with the second shade. A glossy top coat pulls it together and makes the pastel look glassy instead of chalky.
If you’re the kind of person who wants your nails to look “effortless” but you secretly love a pattern, this is such a good compromise. Would you keep it in soft pastels, or would you swap one stripe for Yellow for a tiny sunbeam moment?
Icy Blue French Tips With A Sparkle-Edge Detail
This is a classic French moment, just cooled down for spring – a sheer nude base with crisp sky-blue tips and the prettiest glitter fade hugging the smile line. It’s minimalist because the color placement is controlled, but the shimmer adds that “I did something” vibe without going full glitter nail. If you like spring nail designs almond shape, this elegant taper makes the tip color look extra sharp.
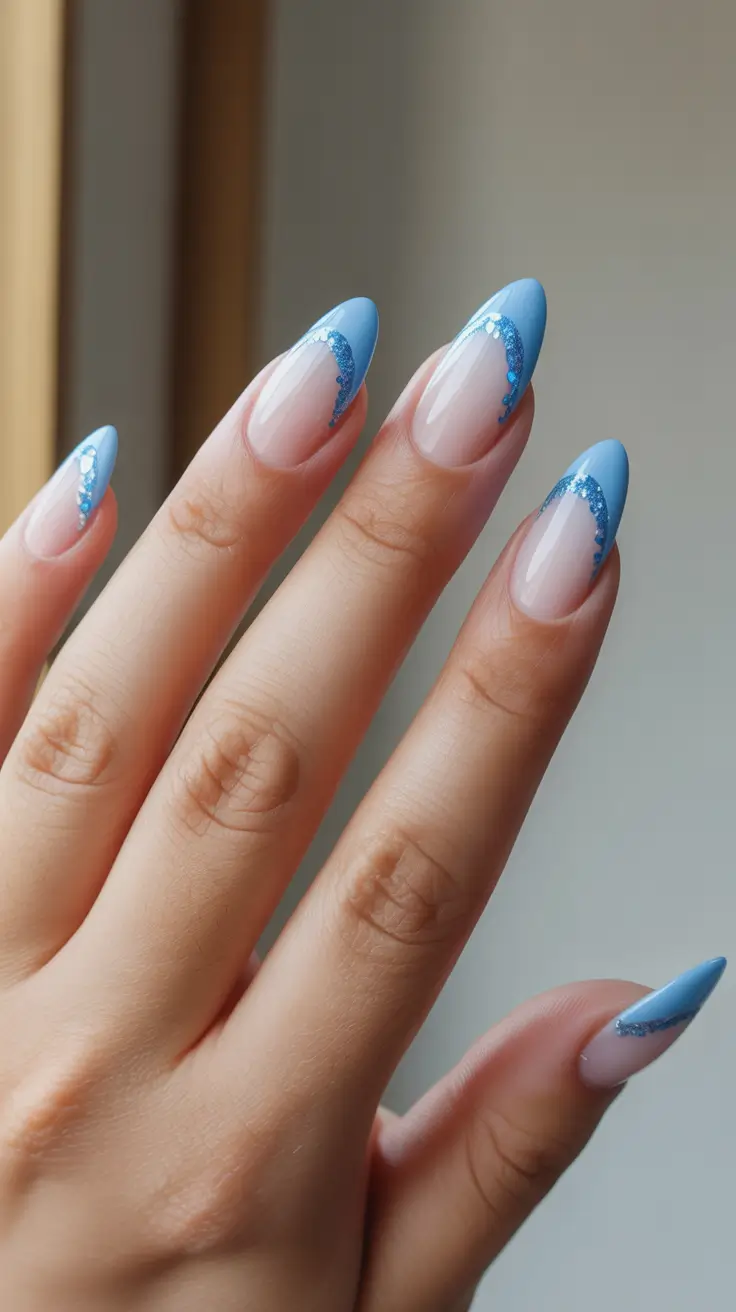
I’d reach for a sheer nude builder or base, an opaque baby blue gel for the tips, and a fine blue glitter gel or loose glitter mixed into clear gel. A curved French brush (or even a small oval brush) helps keep the smile line clean. This one is a natural fit for spring nail designs gel because gel’s control is what keeps that glitter edge looking intentional.
To recreate it, I apply the nude base and cure, then paint the blue tips using a soft curved guide line. After curing, I add a thin sweep of glitter right where the blue meets the nude – lighter toward the center, a touch denser near the corners. Top coat, cap the edge, cure fully, and you’re done.
I love this for those early-spring weeks when you’re still wearing layers but you want something fresh on your hands. It reads Trendy, but it still feels like you could wear it to literally anything.
Pastel Skittle Almonds With One Soft Glitter Accent
Okay, this one is like a spring gelato sampler – different pastel shades across the nails, all glossy and clean, with one accent nail fading into fine sparkle. Even though it’s multi-color, it still feels minimal because everything stays in the same soft, airy pastel family and there’s no heavy art. It’s very Cute, very wearable, and the long tapered shape keeps it sleek – a modern take on spring nail designs acrylic if you love length.
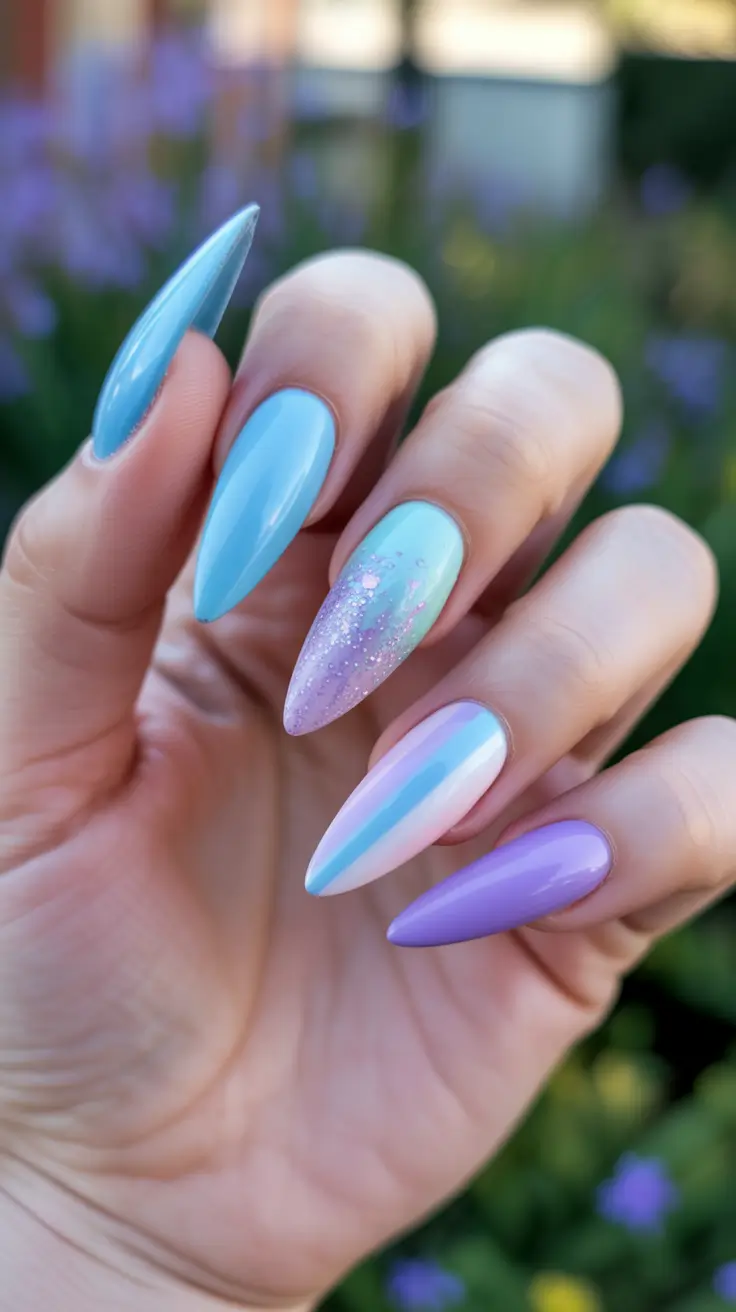
For products, I’d pick 4-5 pastel gels: a light blue, a minty tone, a soft lilac, and a milky pink, plus one glitter topper that’s fine (not chunky). If you’re building length, you can do this as spring nail designs acrylic or gel extensions, but the color story works either way. The key is choosing pastels with the same “milky” opacity so the set looks cohesive.
At home, I paint each nail its own shade after base and curing, keeping coats thin so the pastels don’t streak. For the accent, I apply the pastel base first, cure, then dab glitter from the tip downward in a soft fade. One glossy top coat across everything makes the set look intentional instead of random.
This is what I’d pick when I can’t commit to one color – it’s the nail equivalent of “I want options.” If you’re usually a one-color person, would this feel fun or slightly too adventurous?
Peach And Mint Swirls That Still Read Minimal
These wavy, marbled swirls are giving spring sorbet – peachy pink paired with a cool mint ribboning through a pale base. The design feels fluid and modern, but it stays minimalist because it’s just two main shades and lots of breathing room. If you want minimalist nail design inspiration that isn’t just solid color, this is a pretty, current direction.
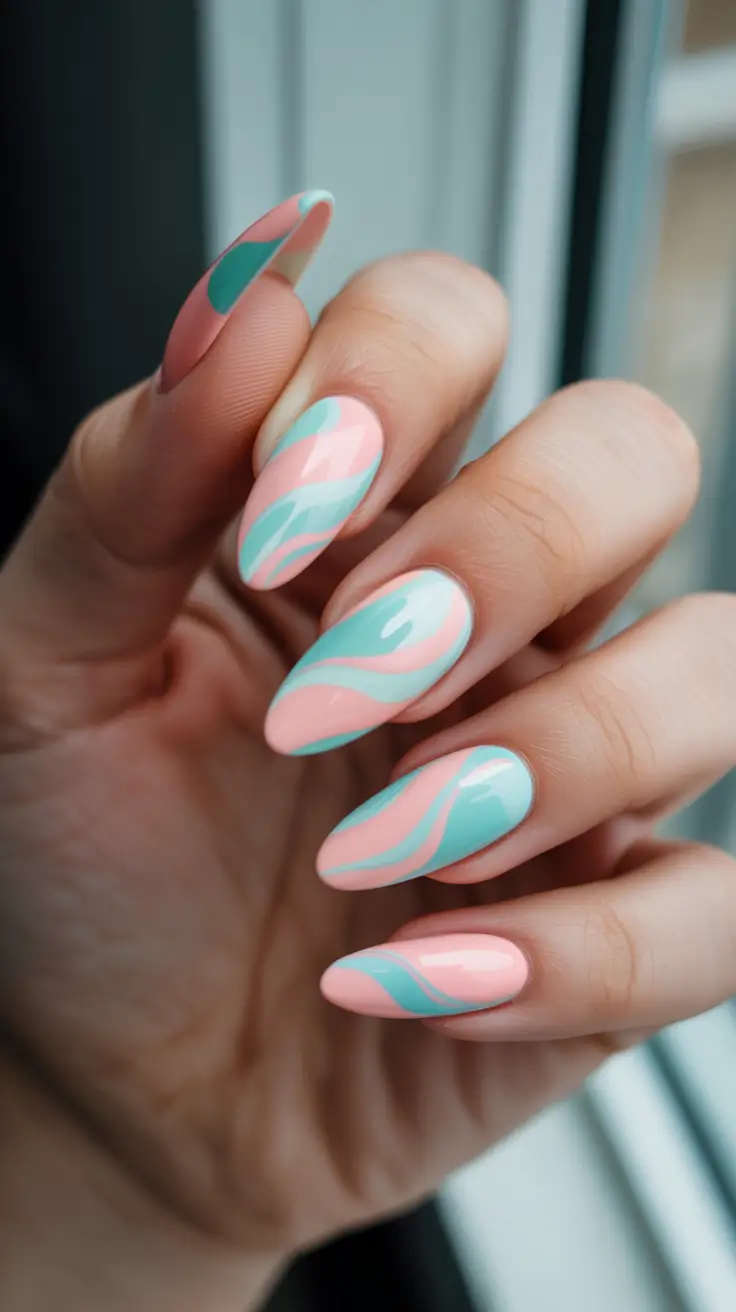
I’d use a sheer nude or milky base, then a pastel peach and a mint-leaning Light green gel. A thin liner brush is ideal, but a toothpick can work in a pinch if you’re careful. This also fits nicely under minimalist nail design simple because the palette does the work – you’re not adding extra elements, just movement.
For the steps, I paint the base and cure, then lay down the peach curves first in thin strokes, cure lightly, and layer the mint curves beside them. I keep the lines tapered at the ends so the swirls look airy rather than thick. Finish with a glossy top coat to blur everything into that smooth, “salon-finished” shine.
Personally, I love this when spring feels like it’s teasing you – warm sun one day, cool breeze the next. It’s soft, fresh, and a little flirty without being loud.
Sage And Lilac Diagonals With A Fine Gold Line
This is minimalist sophistication – muted Green (a sage tone) paired with a dusty lilac, split diagonally and edged with a razor-thin gold line. The design is graphic, clean, and super intentional, and the gold detail makes it feel elevated without piling on decoration. It’s one of those minimalist nail designs that looks expensive even when the concept is simple.
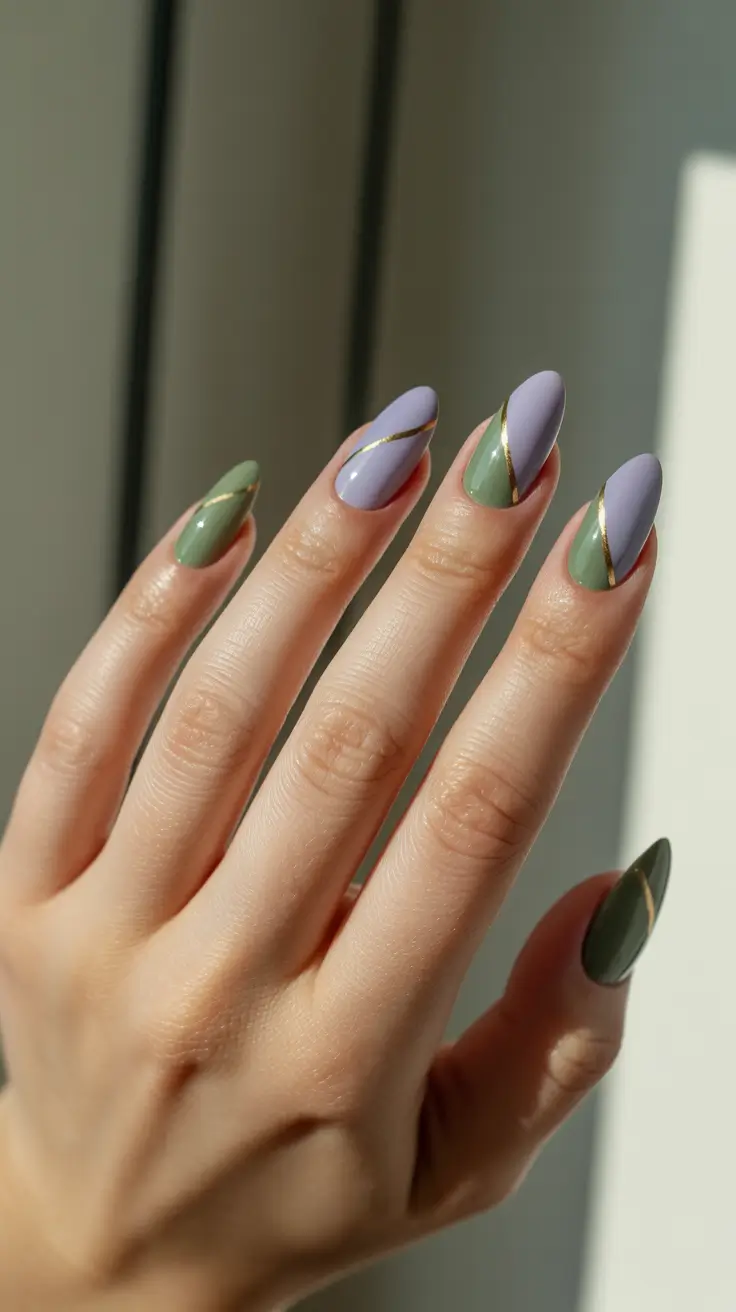
For materials, I’d use a sage gel, a muted lilac gel, and either gold striping tape or metallic gel paint for the line. A flat detail brush helps you cut that diagonal cleanly, and a peel-off liquid latex around the skin can save cleanup time if you’re messy like me on weeknights. This style works beautifully as spring nail designs gel because gel makes crisp color blocking so much easier.
To do it at home, I paint one diagonal color first and cure, then I mask or carefully paint the second color to meet it cleanly. After curing both, I add the gold line right on the seam – thin is everything here. Top coat last, and I press the brush lightly so I don’t flood the line and lose that sharp edge.
This is the manicure I’d wear when I want to feel put-together with zero extra effort – like linen pants energy, but for nails. Would you keep the gold line, or do you prefer it purely color-blocked with no metallic at all?
Pink Almond With Soft Candy-Stripe Accents
This set is my definition of spring minimalism with a wink – glossy baby Pink on most nails, then two accent nails with airy diagonal stripes in pastel pink, sky blue, and white. The base stays clean and milky, so even with the lines it still feels like spring nail designs simple rather than nail art overload. Shape-wise, it’s a smooth almond that reads very spring nail designs almond shape and makes the whole look feel polished.
If I’m recreating this at home, I’d grab a sheer milky base (something like OPI Bubble Bath style, or a builder base if I want structure), an opaque pastel Gel pink, and two striping colors – a soft blue and crisp white. A thin liner brush is the hero tool here, plus a glossy top coat that self-levels so the stripes look like they’re “under glass.” This is also one of those spring nail designs gel moments where curing between tiny steps keeps everything sharp.
The easiest way is to paint the pink nails first, cure, then do the accent nails on a milky base. I like to map out the diagonal lines with the brush barely touching the surface, then fill in alternating colors, curing quickly so nothing bleeds. Finish with a thick top coat and cap the free edge – it’s the difference between “cute today” and “cute for the next 10 days.”
I’d wear this on weeks when I want something cheerful but not loud – like when I’m back in sneakers and a trench, grabbing coffee, pretending I’m not refreshing my calendar every five minutes. It’s Cute, it’s Simple, and it totally counts as fresh Ideas without demanding a full art degree.
Pastel Color-Block Almond With A Clean Chevron Detail
This one is so satisfying because it’s basically pastel minimalism done with geometry. You’ve got a mix of minty Light green, soft lavender, and blushy pink across almond nails, plus one accent nail with a crisp chevron-style color block. It still feels like minimalist nail designs because the shapes are clean and the palette stays soft, but it also looks intentionally designed – very Trendy spring 2026 energy.
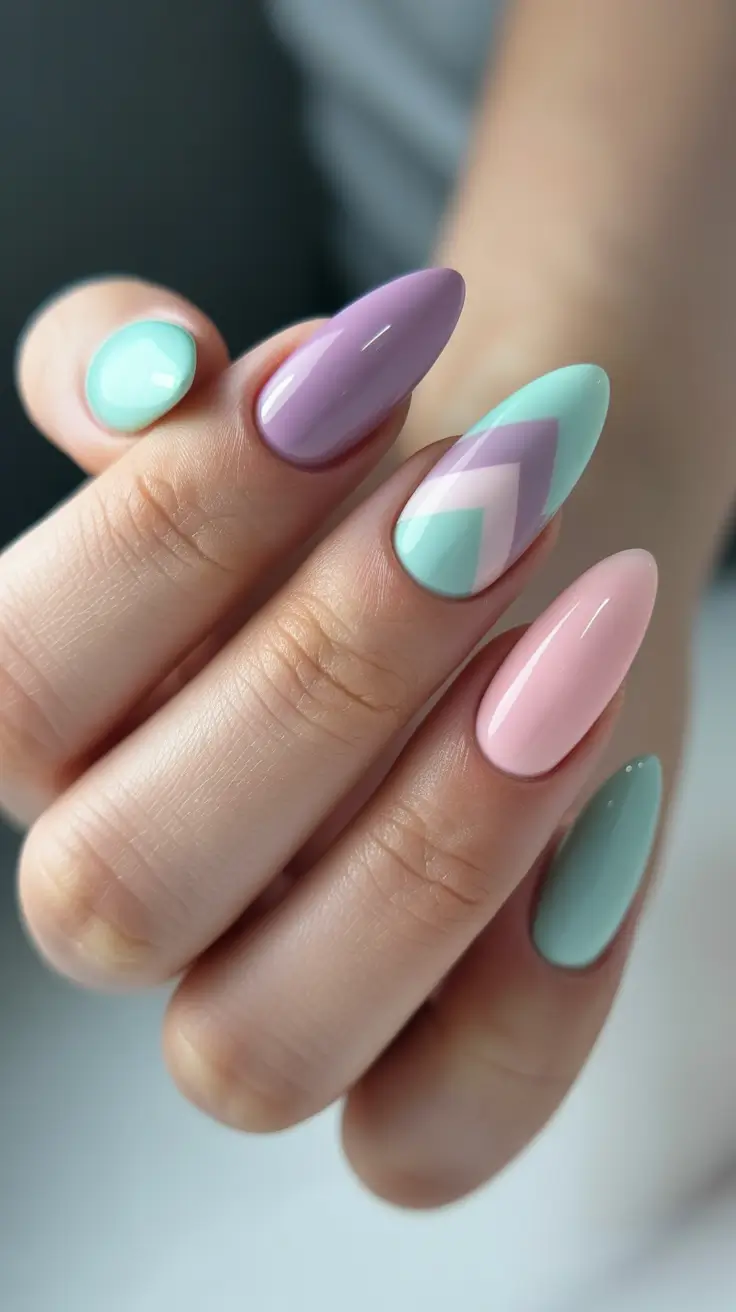
For materials, I’d use pastel gel polishes (mint, lavender, blush), a nude base shade for the chevron nail, and striping tape or a detail brush for sharp edges. Pastels look best when they’re creamy and opaque, not streaky, so I usually go for salon lines like DND or Gelish if I’m doing this in spring nail designs gel mode. A glossy top coat is non-negotiable – it makes the color blocks look intentional.
At home, I’d paint the solid-color nails first, cure, then tackle the chevron accent last. Lay striping tape in a V shape, paint one side mint and the other lavender, cure, then peel tape carefully and top coat. If you’re freehanding, do it in two thin passes and cure between them – it keeps the edges cleaner.
My personal opinion – this is a perfect “I want color, but I also want calm” manicure. It’s playful without being chaotic, and it pairs beautifully with neutral outfits. If you’re building a spring mood board of spring nail designs almond and minimalist nail design inspiration, this one belongs on it.
Lavender Almond With Bright Teal French Tips
Okay, this is minimalist in structure but punchy in contrast – a glossy lavender base with crisp teal French tips that feel like a modern outline at the edge. The shape is long almond and a little fierce, but the design stays clean, which keeps it firmly in the minimalist nail designs lane. It’s giving “soft girl meets confident eyeliner” – and yes, I mean that as a compliment.
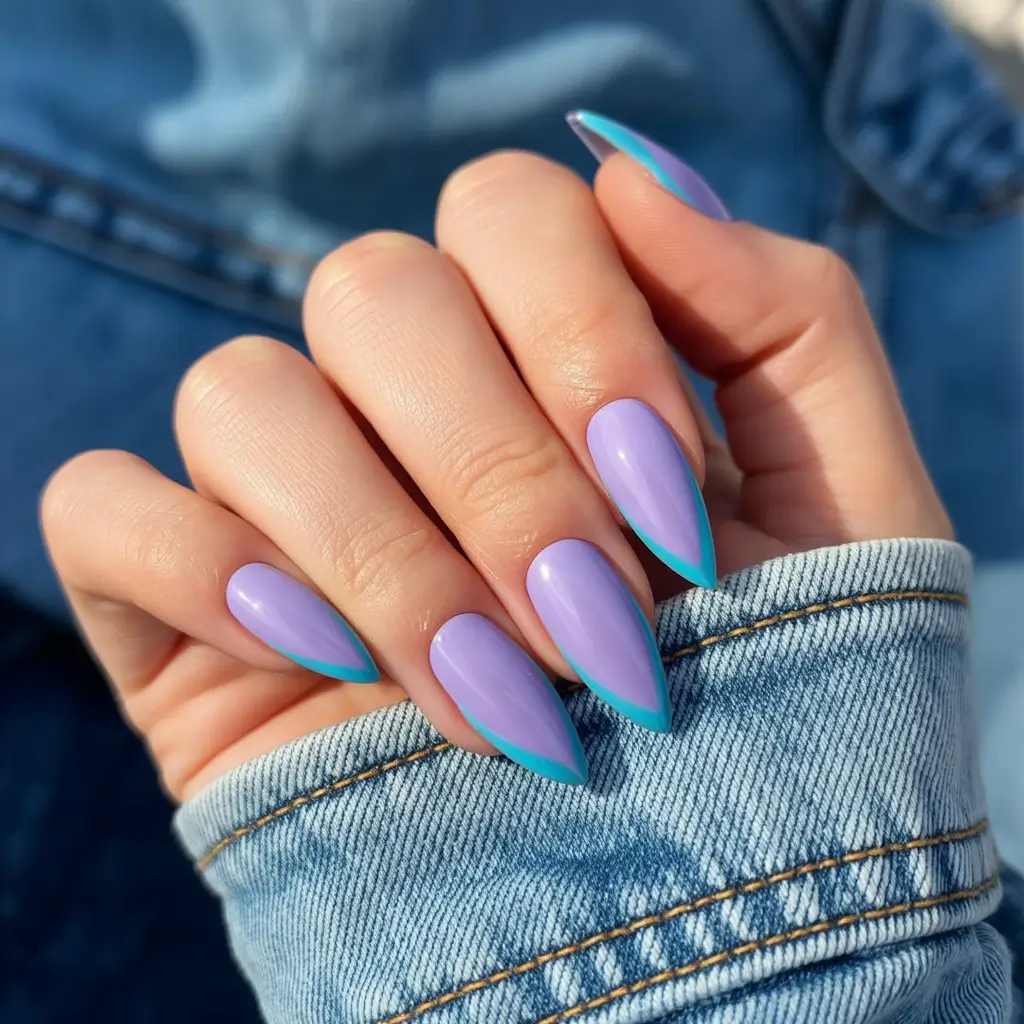
If I’m doing this myself, I want a highly pigmented lavender gel, a bright teal gel for the tips, and a thin French brush or liner brush. This design is easiest with spring nail designs gel because you can perfect the tip placement before curing. A clean-up brush with a little acetone (or slip solution for gel) helps keep the smile line sharp.
Steps: prep, base coat, two thin lavender coats, cure, then draw the French tips starting from one sidewall to the other in a single confident sweep. I usually do a thin outline first, then fill it in, curing briefly so it doesn’t drift. Finish with top coat, cap the free edge, and add cuticle oil so the look feels fresh, not just painted.
I love this for that time of year when the weather can’t pick a personality – one day sunny, next day windy, and you’re still wearing denim. The color combo feels upbeat without being loud, and it’s a fun twist if your usual Ideas are pinks and nudes.
Short Pastel Split Nails In Yellow And Lavender
This set is proof that spring nail designs short can look insanely cute and intentional. The nails are short and rounded, with alternating pastel lavender and buttery Yellow, plus a few nails split vertically into two clean halves. It’s graphic but still soft – the kind of spring nail designs simple I’d recommend to anyone who wants color without complicated art.
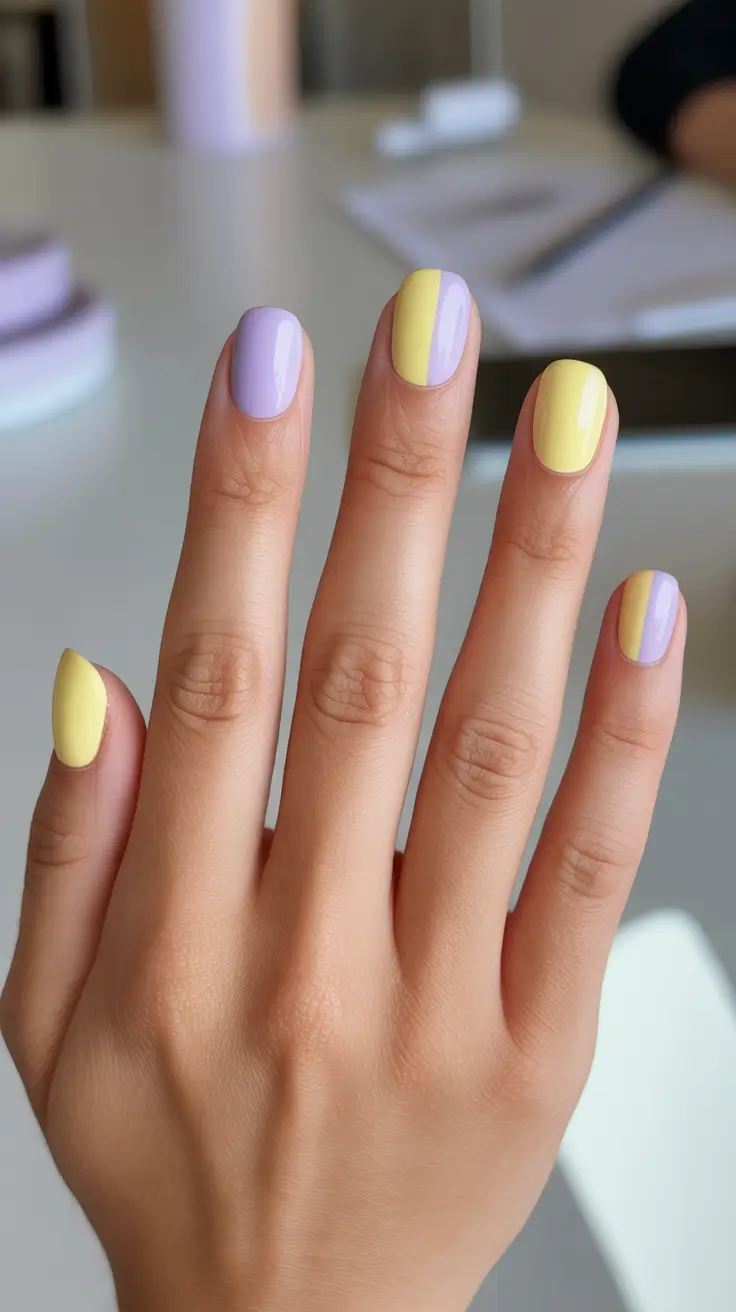
I’d use two creamy pastel polishes (a pale lavender and a soft yellow), a base coat that grips well, and either striping tape or a flat detail brush for the split nails. If you go gel, this becomes even easier because you can flash-cure each half before painting the other side. This is a great entry point for spring nail designs gel if you’re still learning details.
At-home method: paint the solid nails first, cure or dry, then do the split nails by marking the center line lightly with the brush. Paint one half, cure, then paint the other half and cure again. Top coat everything and cap the edges – short nails chip at the tips first, so that extra step matters.
I’d pick this set for busy weeks when I want my nails to look cheerful but low-maintenance. It’s Cute, it’s Trendy, and it feels like spring without leaning into flowers or sparkles.
Mint Short Nails With Tiny Blossom Branches
This one feels like the first real day of spring – soft minty Light green nails mixed with pale pink and lavender, plus little blossom branches painted on a couple nails. The art is delicate and spaced out, so it still counts as minimalist nail designs short instead of full-on floral chaos. The length is short and rounded, which makes it extra wearable and sweet.
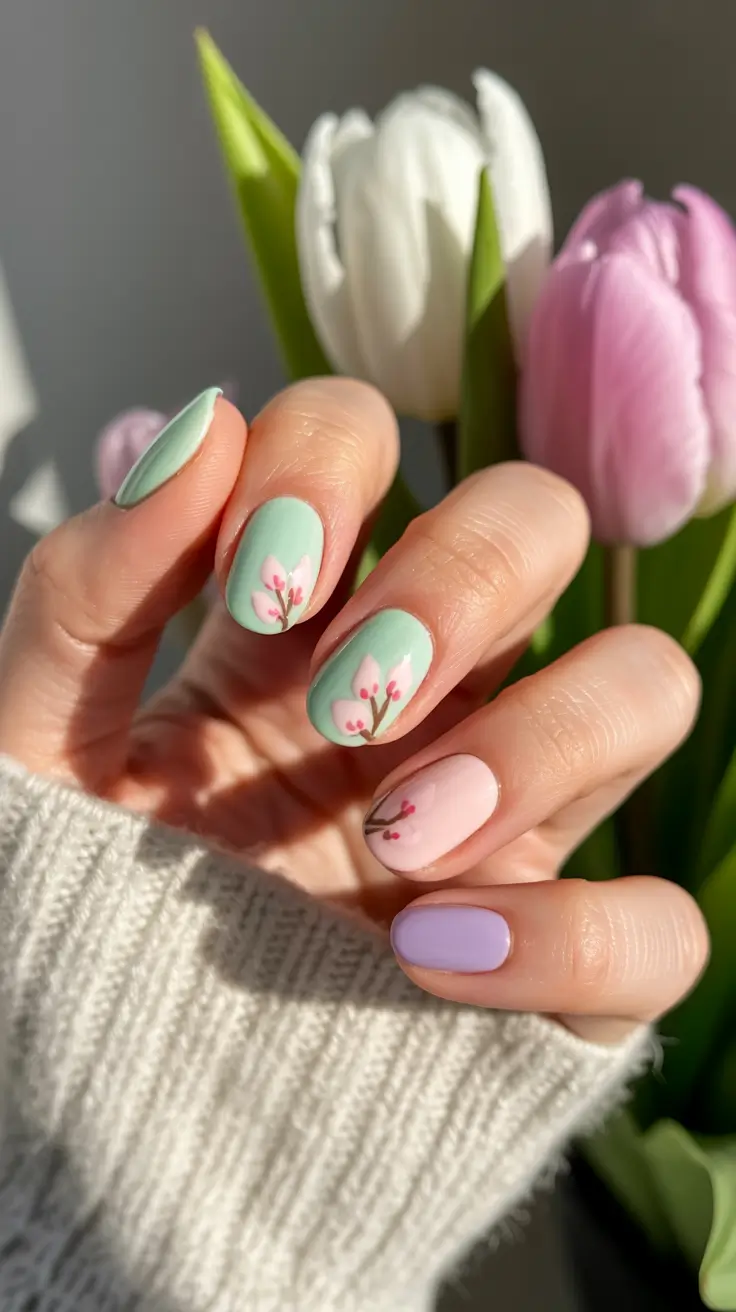
For materials, I’d grab a mint gel/polish, a pale pink, a soft lavender, and a super thin liner brush for the branches. For the blossoms, dotting tools help – but honestly, a bobby pin tip works in a pinch. If you want the design to last, this is ideal for spring nail designs gel because you can cure each tiny detail and keep it crisp.
My steps would be: paint the base colors first and cure, then draw the branch lines with a taupe-brown or soft charcoal (black can look too harsh with pastels). Add tiny pink dots for blossoms, cure, then top coat to seal everything smooth. Keep the art minimal – a couple branches is enough to tell the story.
My honest take – this is the manicure I’d choose when I’m craving something gentle. It’s one of those Ideas that makes you feel put-together even if you’re wearing a sweatshirt and answering emails all day. Also, if you’re usually a plain-nude person, this is a very safe way to flirt with florals.
Baby Blue And Blush With Silver Crescent Accents
This set leans more glam-minimalist, and I’m into it. The base colors are baby blue and soft blush pink, and a few nails have a silver crescent detail near the cuticle that looks like a clean half-moon or a diagonal metallic frame. The silhouette is more structured and straight-edged – it reads like spring nail designs square with a modern finish, but the palette keeps it soft.
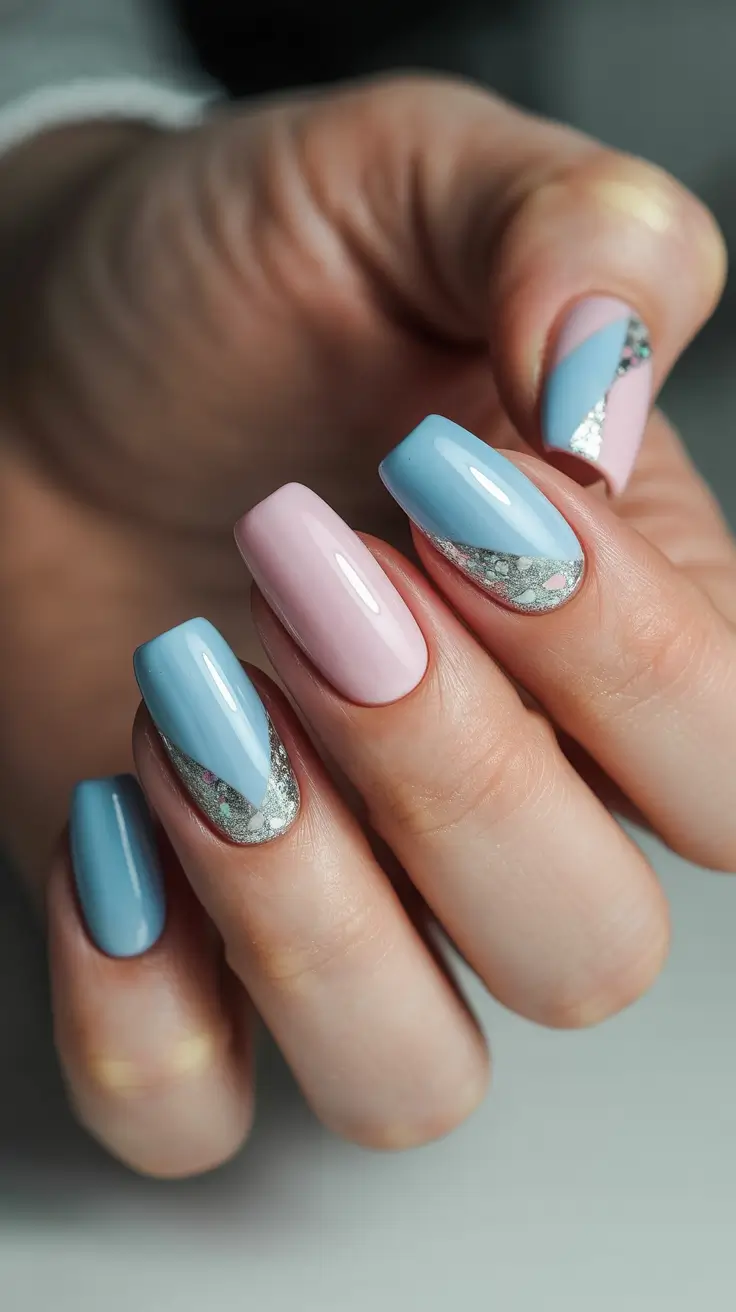
If I’m doing this at home, I want opaque baby blue and blush gel polishes, plus a silver glitter gel or metallic foil gel for the crescent. A detail brush helps place the curve cleanly, and a top coat with good thickness will “bury” the metallic so it doesn’t catch on hair or clothing. This is definitely one of those spring nail designs gel looks where a smooth finish makes it look expensive.
Process-wise: base color first, cure, then map the crescent shape near the cuticle with a thin brush and fill it with silver. Cure again, then top coat generously, making sure the metallic edges are sealed. If you’re using foil, press it into a tacky layer, seal with gel, then top coat.
I like this for nights out or weeks when you want something a little sharper but still not loud. It’s clean, reflective, and feels very 2026 – like minimalist jewelry, but for your nails. If you’ve been collecting Trendy Ideas that still feel grown-up, this one hits.
Lavender Almond With A Single Polka Dot Accent
This is quiet spring perfection – glossy lavender almond nails with one accent nail in a nude base covered in tiny white polka dots. The dots are evenly spaced and delicate, so it stays in minimalist nail designs territory instead of turning into something cartoonish. It’s simple, sweet, and looks insanely neat when your cuticles are clean.
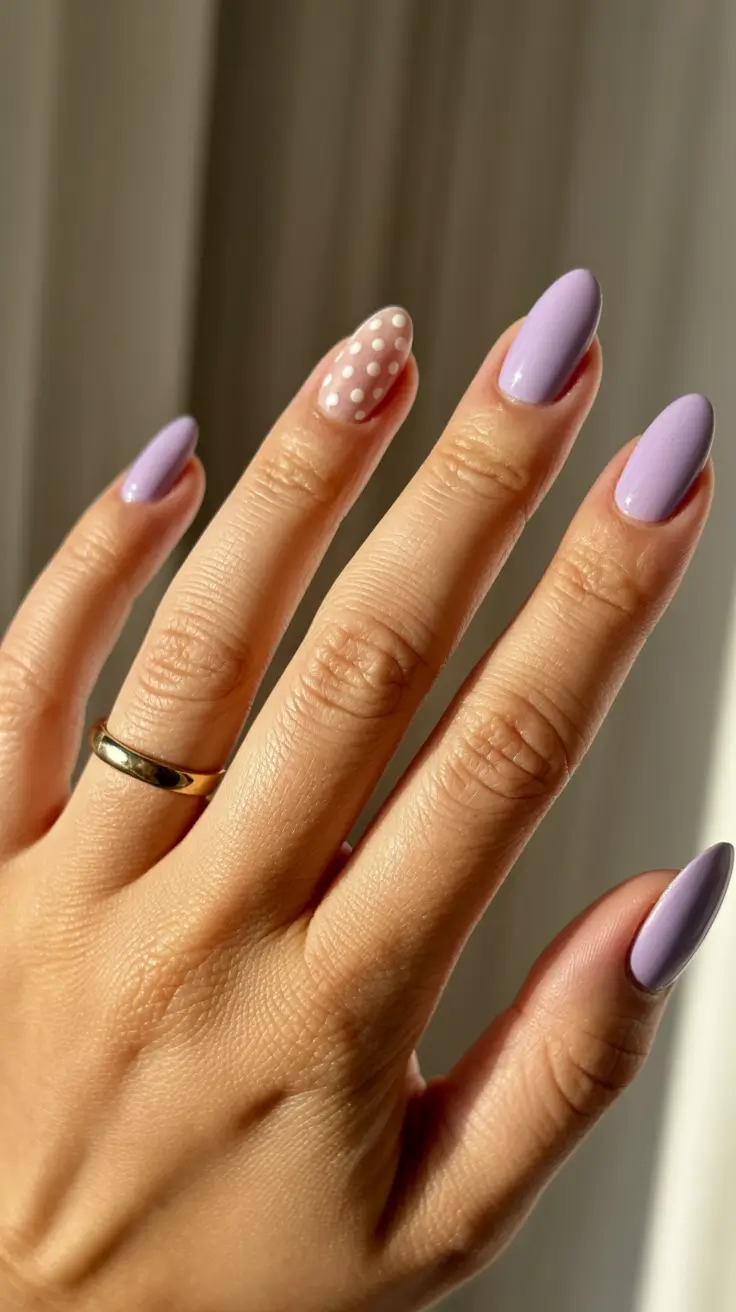
All you need is a lavender polish or Gel, a sheer nude for the accent, white dotting polish, and a dotting tool. If you don’t have one, the rounded end of a hairpin works. I also like using a quick flash-cure between dot rows when I’m doing gel – it prevents accidental smears.
Steps: paint lavender nails, cure, paint the nude accent, cure, then add dots in a loose grid pattern. Keep the dots small – that’s what makes it feel modern and minimal. Seal with top coat, and don’t forget cuticle oil because it makes the whole manicure look like it cost more than it did.